
Are you wanting to learn how to bake sourdough bread but feeling overwhelmed? This Sourdough for Beginners: A Guide & Recipe will step you through the process in an easy-to-understand way and hopefully give you the confidence to bake your own loaf of sourdough bread.

Baking sourdough bread can seem intimidating with all the conversions, fancy tools, and foreign-sounding terms. But, it doesn’t need to be. Naturally leavened bread was around long before kitchen scales, bench scrapers, and dough whisks. All you truly need to make sourdough bread is an active sourdough starter, flour, water, and patience. This Sourdough for Beginners: A Guide & Recipe will step you through the process in an easy-to-understand way and hopefully give you the confidence to bake your own loaf of sourdough bread.
Jump To
What is Sourdough Bread?
Sourdough is bread made with wild yeast. People have been baking bread for millenniums and until the invention of commercial yeast in the mid-1800’s bread was leavened using wild naturally occurring yeast.
The name sourdough comes from the very distinct sour flavor that naturally leavened bread has. This sour flavor is a result of beneficial bacteria that live in your sourdough starter with the wild yeast. These bacteria are also responsible for the many health benefits of sourdough bread and what set it apart from commercial yeast.
The long fermentation and beneficial bacteria make sourdough much easier to digest and more nutrient and antioxidant rich. Sourdough also acts as a prebiotic and can be great for improving digestive issues and overall gut health.
Getting Started
What is Sourdough Starter?
Sourdough starter is a yeast culture that you maintain to use in sourdough baking. Simply put, it’s a jar of wild yeast that you keep alive with regular feedings of flour and water. The water in a sourdough starter provides moisture to create the ideal environment for the yeast to live. The flour feeds the yeast and bacteria living in your starter allowing them to multiply. You use this sloppy mixture of wild yeast, bacteria, water and flour in sourdough recipes to leaven them.
If you don’t have a starter but would like to make one, take a look at my How to Make a Sourdough Starter guide.
Keeping a Sourdough Starter
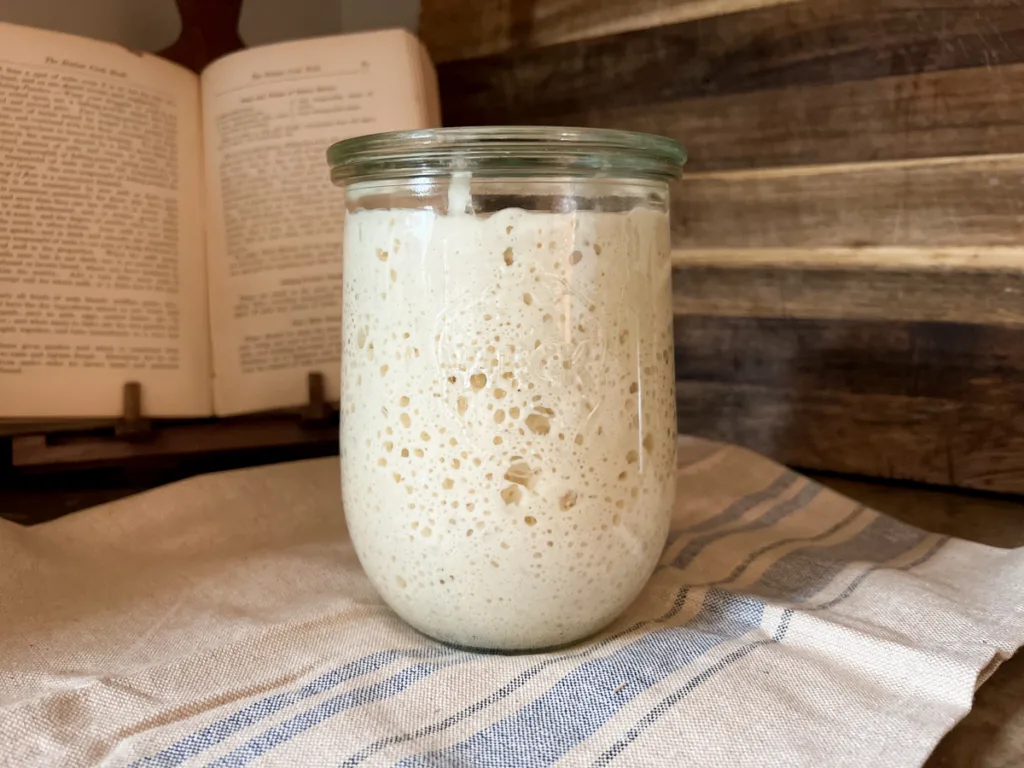
Once you have an established sourdough starter, you will notice it rises and falls between feedings. This rising action is due to the yeast and bacteria feeding off the flour and multiplying. When they multiply, they release gases, which get trapped in the sticky flour and water mixture, causing it to rise and giving it its iconic bubbly look.
When your sourdough starter begins to deflate and fall it is because the yeast and bacteria have eaten up all the starch in the flour and cannot continue to multiply. This lets you know that it is time to feed your sourdough starter.
With each feeding you transfer only a small amount of sourdough starter to a new jar and replenish it with flour and water. Whatever is left from the last jar you either bake with or discard, known as sourdough discard.
Using Sourdough Starter
When using starter in a recipe you want to use it when it’s at or just past its peak. Your sourdough starter is at its peak when it has at least doubled in size. Using starter when it is at its peak and up to two hours after it begins to fall ensures you’re getting the most yeast to use for baking.
To use your sourdough starter in a recipe feed it about 8-16 hours before you plan to bake. When it’s at its peak simply scoop it from its jar to weigh or measure it. Simple as that.
How Do I Get Sourdough Starter?
Before you can begin baking sourdough bread you will need a Sourdough Starter. You can easily make your own sourdough starter in as little as a week at home. If you’re in a hurry to get your hands on one sooner, you can ask someone you know with a sourdough starter to give you some of theirs or you can purchase an already established starter online.
Tools I Recommend
To bake sourdough bread all you truly need is a sourdough starter, water, flour and patience. But there are a few tools I highly recommend make your sourdough journey much easier.
- Kitchen Scale: Majority of the sourdough recipes you will encounter, including many of my own, are written in gram conversions for accuracy. Having a kitchen scale on hand also saves you from having to wash a ton of measuring cups.
- Dutch Oven: It is possible to bake sourdough bread without a Dutch oven, but I find it much easier to use one. I use a fairly inexpensive Lodge Cast Iron Dutch Oven
Making Sourdough Bread: Step-By-Step
Long ferment times can be off putting for beginner sourdough bakers, but it’s helpful to remember that this is what makes sourdough so special. Wild yeast produces carbon dioxide, the gas that lifts our bread, at a much slower rate than baker’s yeast. During the long rise time is when the beneficial bacteria go to work breaking down the acids in the dough and giving us the wonderful health benefits of sourdough and its wonderfully sour taste.
This recipe is a two-day process, but don’t let that deter you. The hands-on time is very minimal, and the wait will be well worth it.
To help you plan ahead take a look at my Sample Bakers Schedule.
Step 1: Feeding Your Starter
8-16 hours before you plan to mix your dough feed your sourdough starter.
In a small clean jar add:
- 25g unfed sourdough starter
- 25g filtered water
- 25g organic bread flour
Cover loosely and place in a warm spot. Your starter should peek somewhere between the 8-10 hour mark.
Step 2: Mix Your Dough
In a large mixing bowl add:
- 50g peaked sourdough starter
- 310g filtered water
Whisk together until the starter is completely dissolved into the water.
Save the remaining 25g starter that you didn’t use to feed in a clean jar and keep your sourdough starter going.
Using a stiff spatula add in:
- 450g organic bread flour
- 10g salt
Once mixing with your spatula becomes difficult go ahead and get your hands in there. Mix by hand until everything is fully incorporated.

Step 3: Stretch and Fold
Once your dough is mixed cover your bowl with a damp cloth and allow it to rest for 30 minutes. During this initial rest time, often called autolyse, your flour will fully absorb the water and begin to relax.
After the 30-minute rest you will stretch and fold your dough.
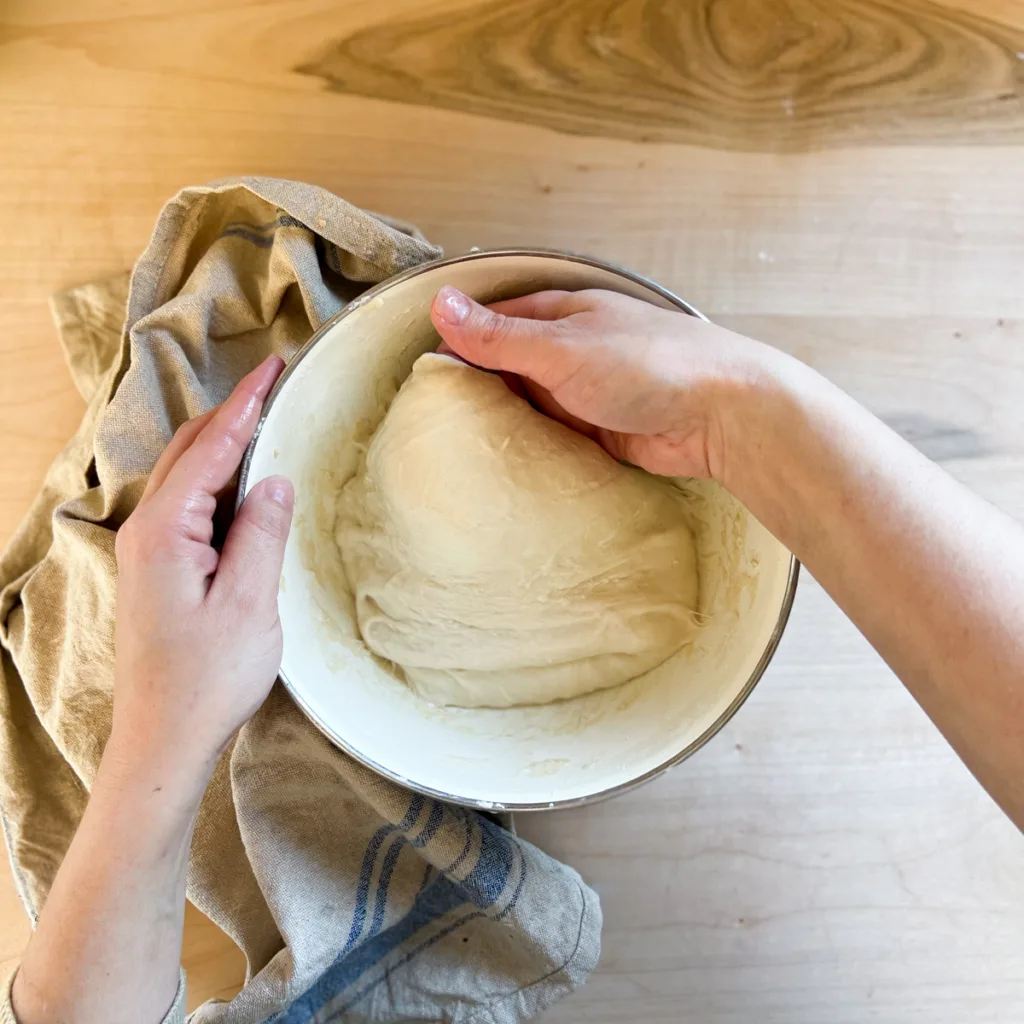
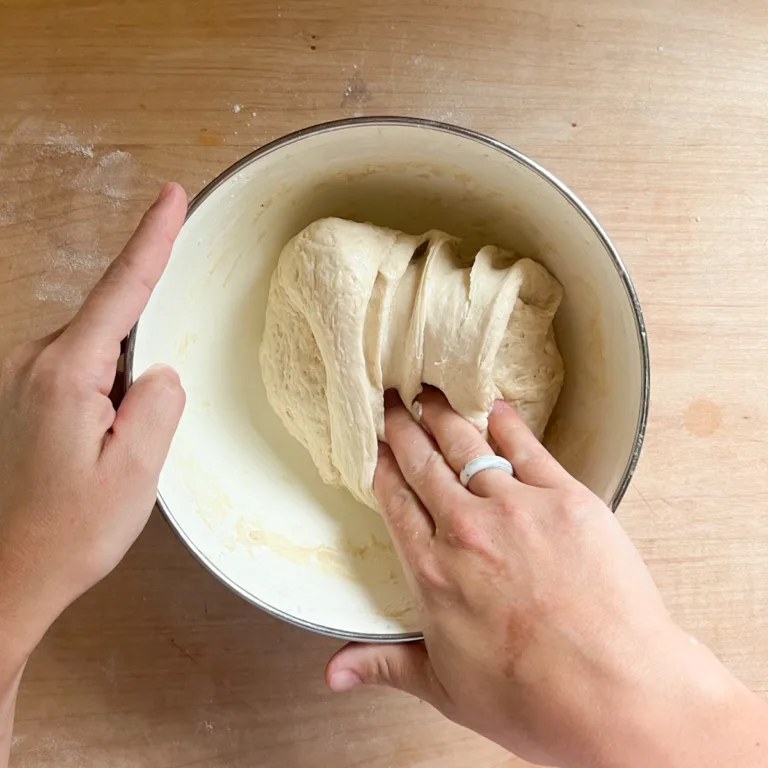
How to Stretch and Fold:
- Lightly wet your hands before handling the dough to prevent sticking.
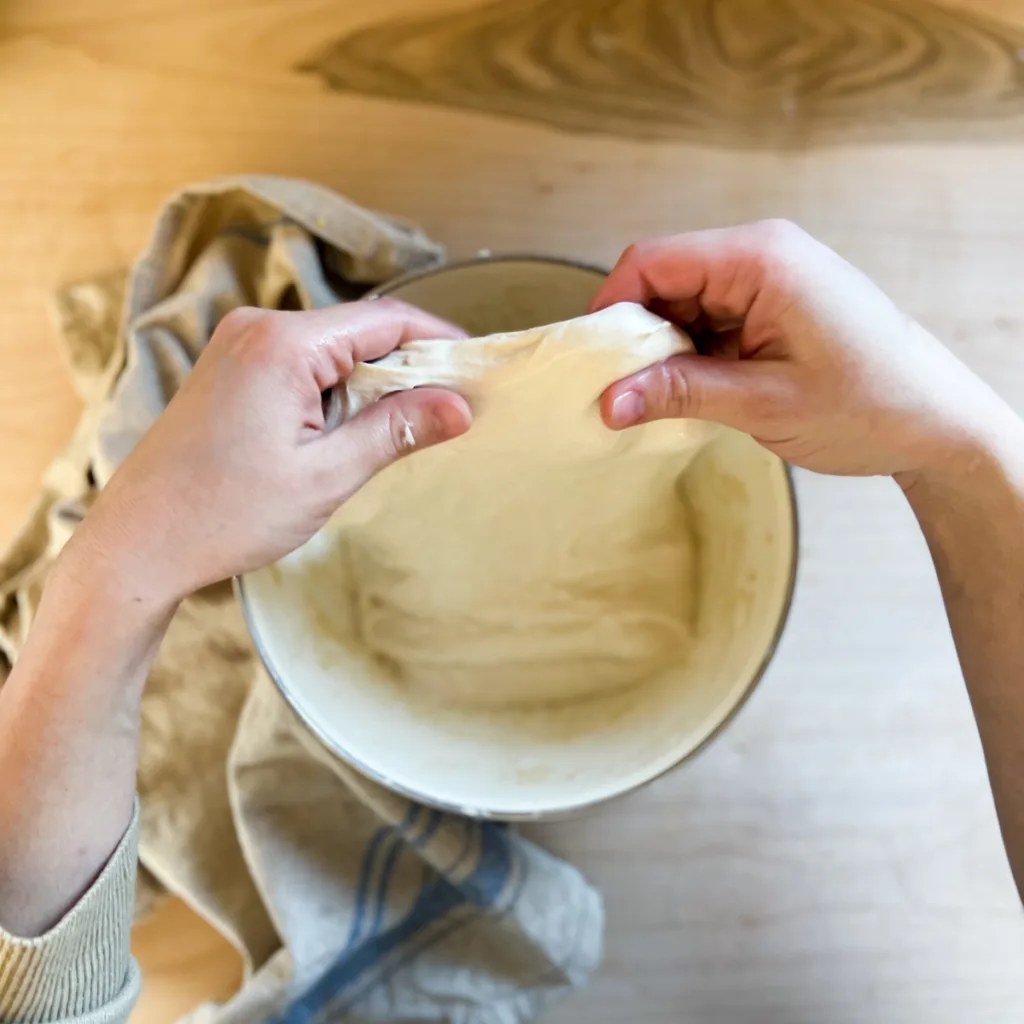
- Scoop up an edge of the dough and gently pull it upwards.
- Once the dough reaches a point where it resists being pulled go ahead and fold the dough over itself.
- Give the bowl a quarter turn and repeat this stretching and folding motion.
- You will turn the bowl, stretch and fold until the bowl comes full circle. These four stretch and folds are called a set.

Repeat this process of resting for 30 minutes and performing stretch and folds two more times. You will have performed three sets of stretch and folds total.
Why do we Stretch and Fold?
Stretching and folding works similar to kneading without so much work. It gently incorporates air and adds strength to your dough by developing the gluten. A strong gluten structure will trap the gasses produced by the yeast and giving you an open and airy crumb. None of us want a flat loaf.
Step 4: Bulk Fermentation
Now we wait. Cover your bowl with a damp cloth and allow your dough to bulk ferment for another 4-8 hours.
What is Bulk Fermentation?
Bulk fermentation starts as soon as the dough has been mixed and ends right before the dough is shaped. During bulk fermentation the gluten fully forms and the dough rises. This is the most hands-off step in baking a loaf of sourdough bread but often the most difficult to master for sourdough beginners.
How Long will it Take?
There is no set time for how long this will take. Bulk ferment times will depend on the strength of your starter, the type of flour you use, and the temperature of your home. Temperature being the main factor.
At 72°F(21°C) my dough takes about 6 hours to finish bulk ferment. If your home is warmer the dough will ferment much quicker. If your home is colder the dough will ferment much slower.
How do I Know When it’s Done?
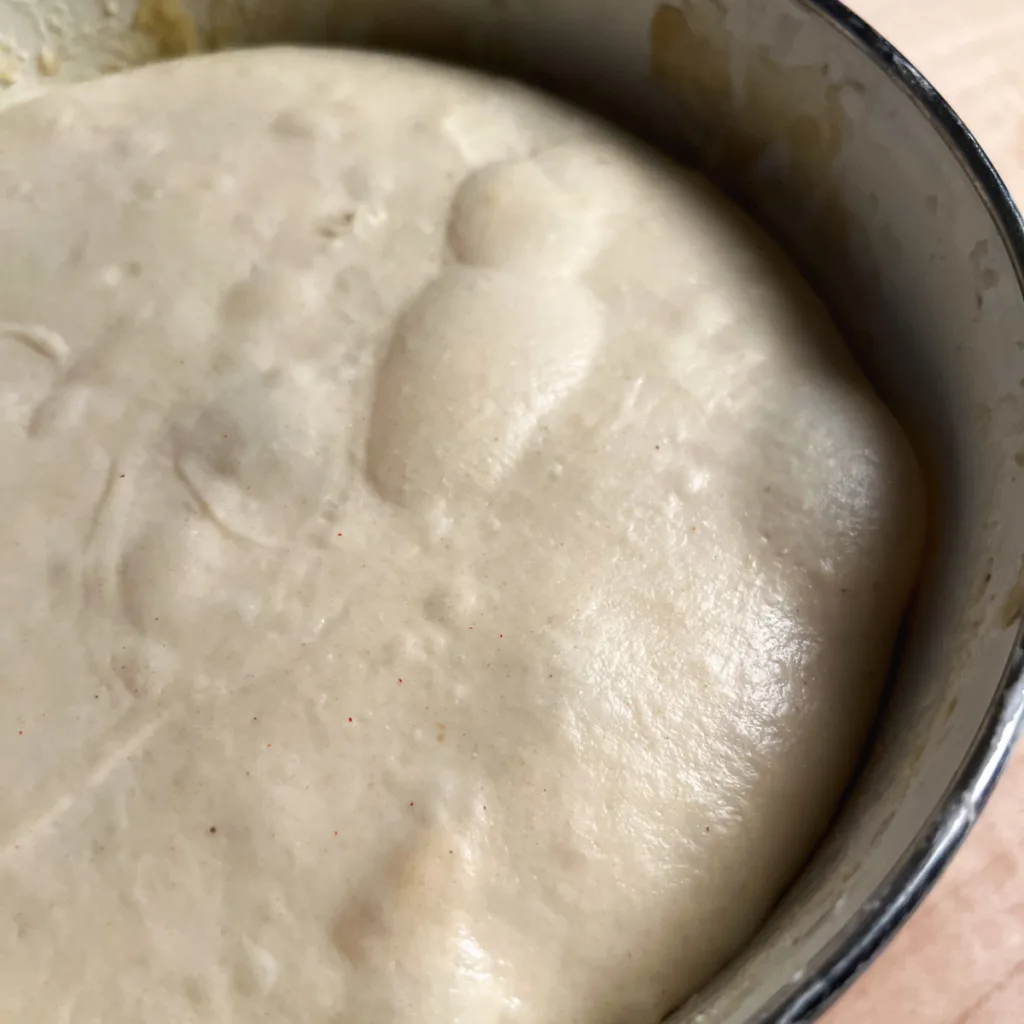
The best way to know when bulk fermentation has finished is by the way your dough looks and behaves. You will want to look for these signs:
- The dough has doubled in size.
- Your dough has a slightly domed top with visible bubbles on the surface.
- When you shake your bowl, the dough is light and jiggly.
The first couple of times you bake I suggest checking your dough every hour starting 4 hours after you mixed your dough for these signs. With each bake you will get better at determining when bulk ferment is done.

Step 5: Shape the Dough
Once bulk fermentation is done its time to shape your dough.
Lightly wet or flour your work surface and turn out your dough. Be gentle when turning out the dough to avoid deflating it.
The first part of shaping your loaf is called the pre-shape. Pre-shaping is exactly what it sounds like. It’s the process of roughly shaping your dough so that it’s easier to shape.
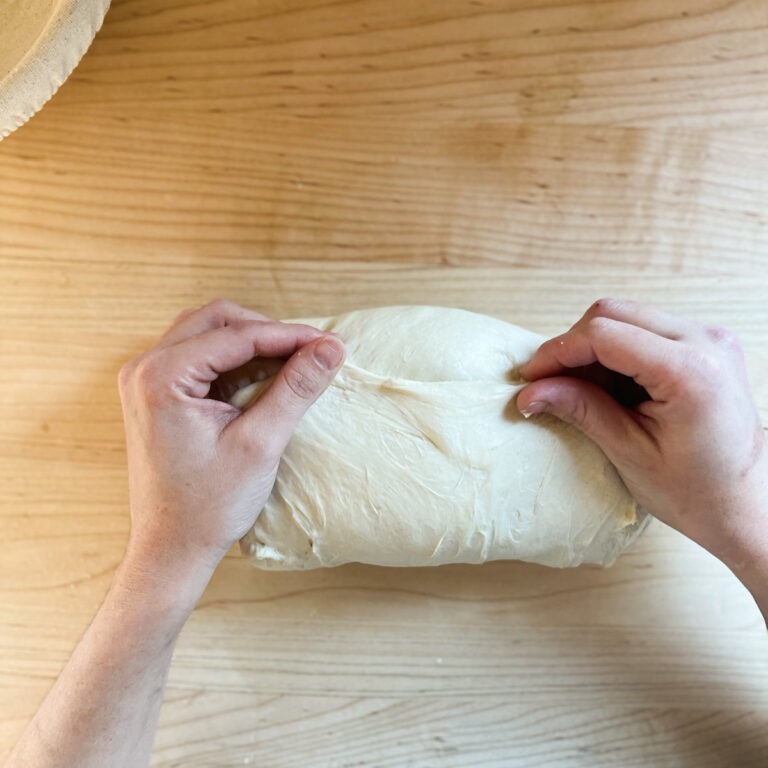
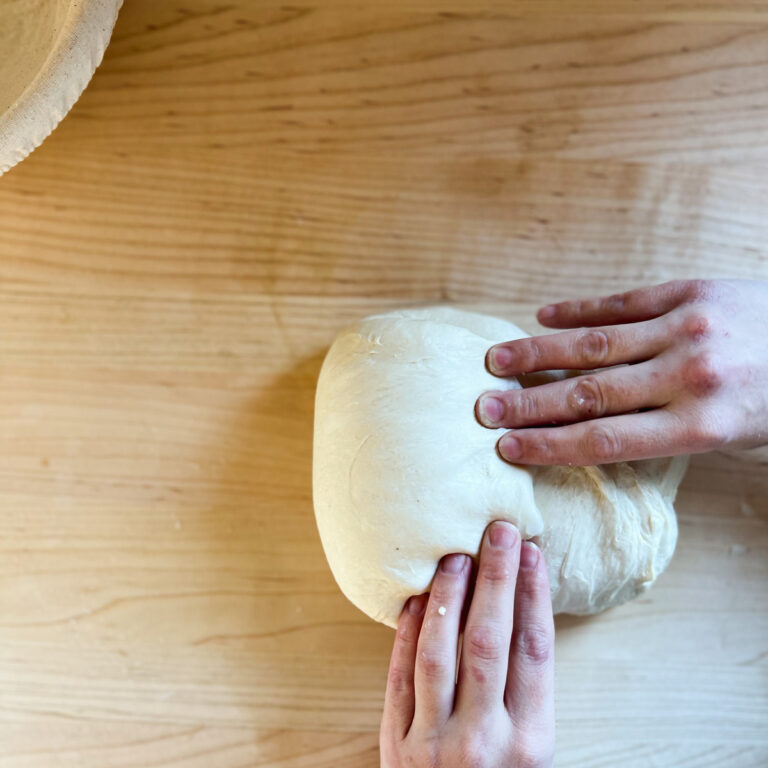
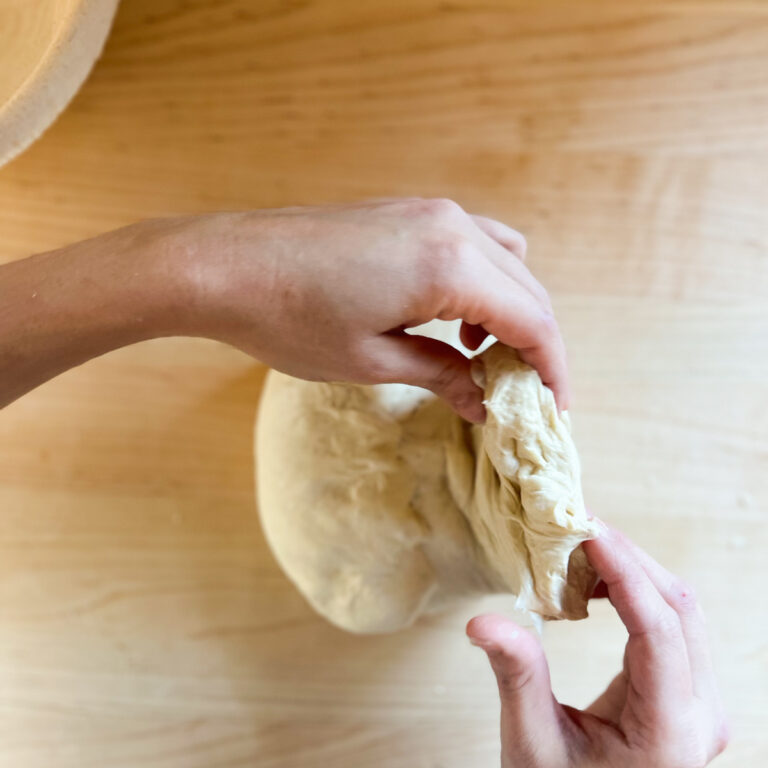
How to Pre-Shape:
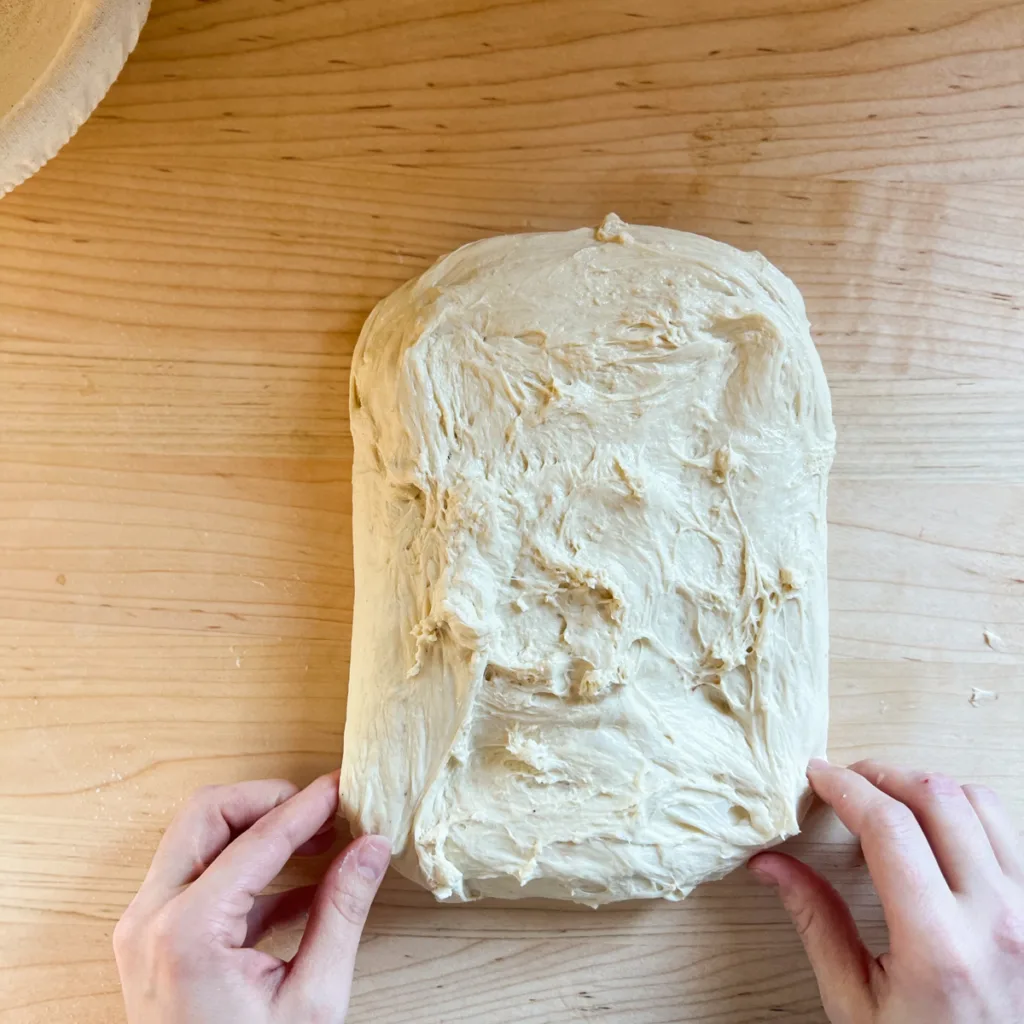
- Lightly wet your hands to prevent the dough from sticking.
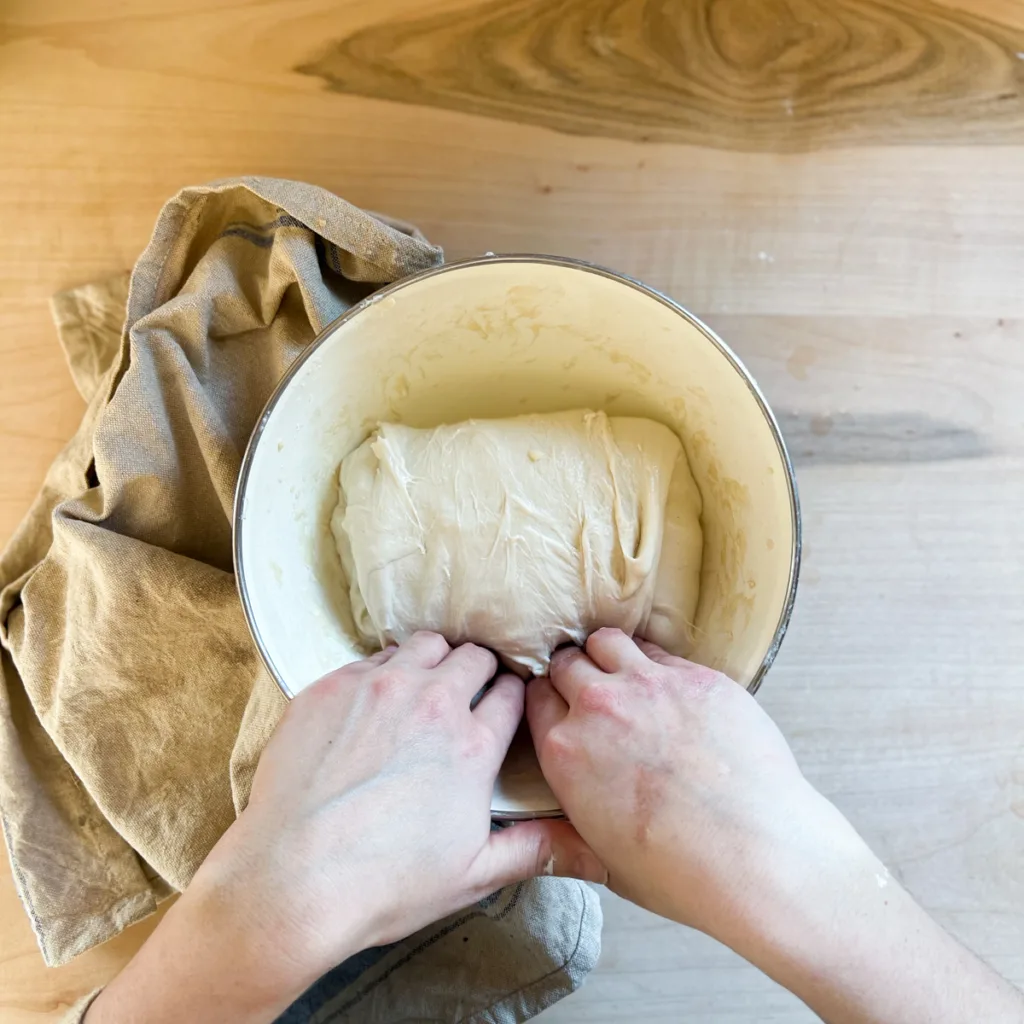
- Gently tug the corners of your dough to roughly form a rectangular shape.
- Lift the top edge of your dough and fold it onto the center of itself.
- Lift the bottom edge of your dough and fold it up and over the top fold.
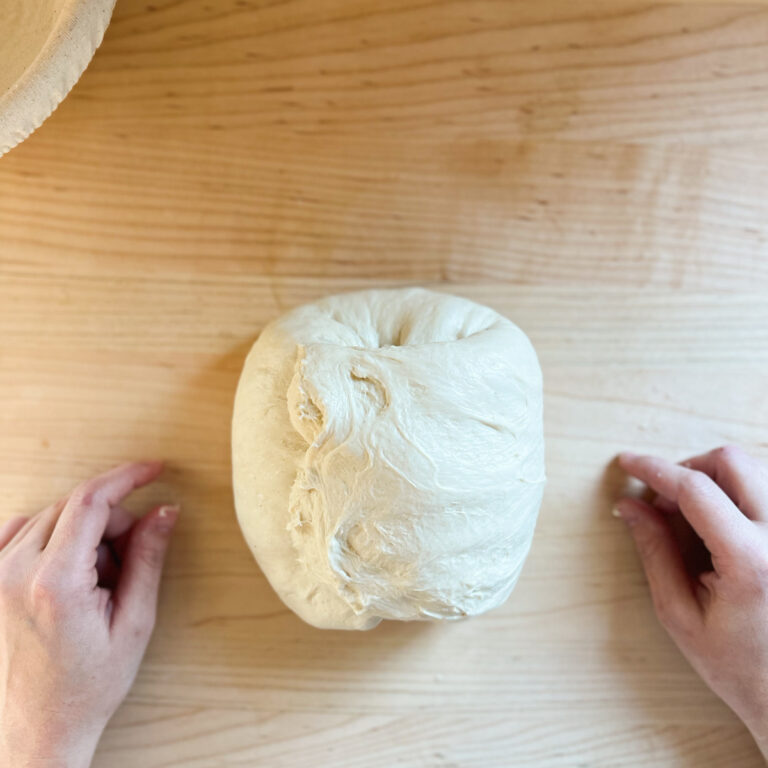
- Now fold in the sides.
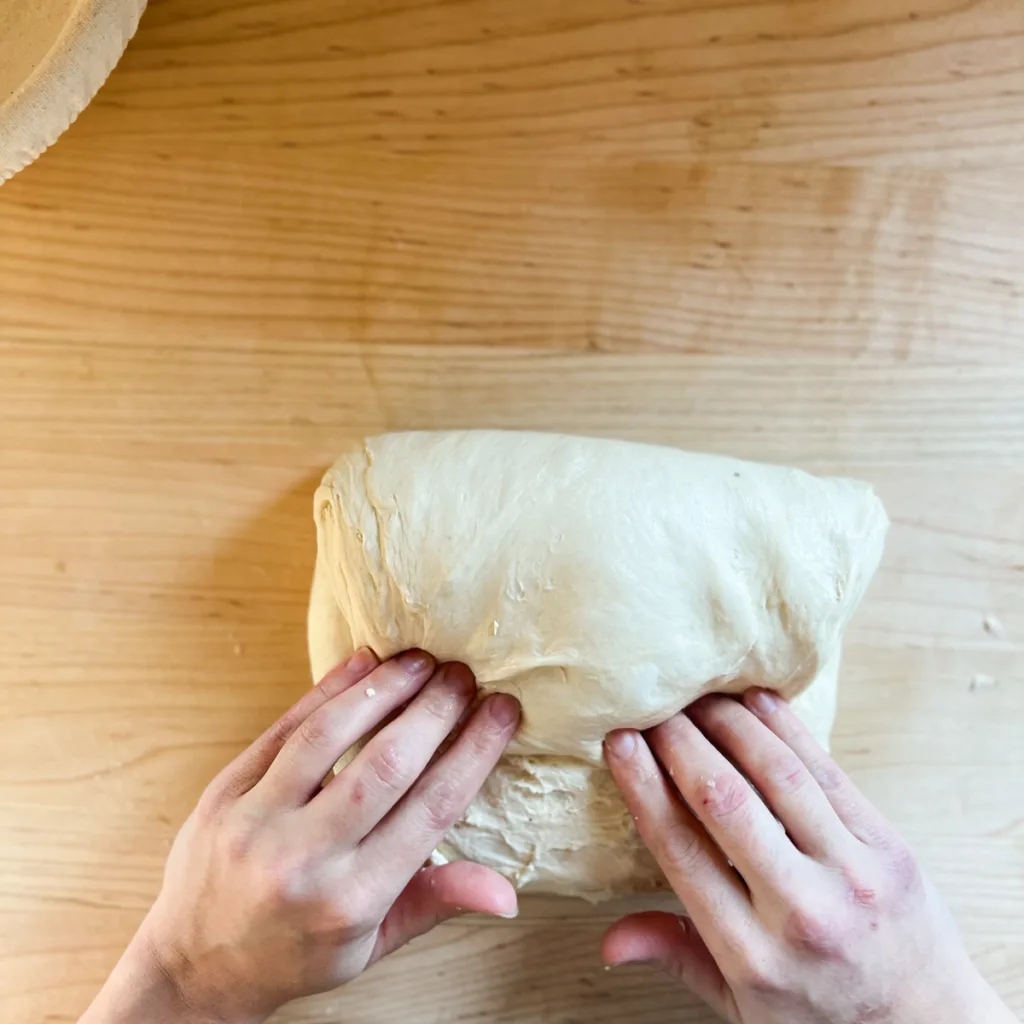


After pre-shaping you will have a nice somewhat round little ball of dough. Flip this over so it is seam side down and let it rest for 30 minutes. The resting period after pre-shaping is often called a bench rest.
How to Shape:
Now its time to give your dough a final shape. The final shaping is an important step. It will allow your bread to evenly expand upwards and outwards in the oven. It will also create surface tension needed to form that thin and crispy sourdough crust we all know and love.


To shape the dough cup your hands around it and slowly drag it towards yourself. Turn the dough as needed and continue this technique until you have a tight round boule of dough.
Note: If the top of your dough begins to tear during shaping go ahead and stop. This just means you have over shaped. Don’t fret, it will still taste delicious.
Step 6: Proofing
After shaping, your dough needs a second rise. This rise is called proofing and is typically done in a banneton or bowl.
Dust your dough with flour and place it seam side down in a parchment lined medium sized mixing bowl.

How Long Do I Proof?
Proofing is finished when the dough is slightly puffed up and no longer dense. This can take 1-2 hours at room temperature. Proofing can also be done in the fridge for 4-12 hours. Fridge proofing takes longer but is a great option for when you’ve run out of time and want to bake the next day.
Note: Longer fridge proof times will yield a more sour flavor in your bread.
Step 7: Score and Bake
Now it’s time to bake. Preheat your oven to 480°F with your Dutch oven inside.
Do I Need a Dutch Oven?
In order to rise properly and develop a nice crust, your bread needs steam while it cooks. Dutch ovens create the perfect environment for this by trapping the steam released by your dough during baking. While it’s entirely possible to bake without one, this is my preferred method. If you don’t own a Dutch oven, you can use an oven-safe stock pot and lid or check out Crave the Good’s Baking Sourdough Without a Dutch Oven guide.
Once your oven is preheated you can score your dough. Using the parchment paper lift your dough from the proofing bowl or gently flip it out of your banneton. To score your dough make a 1/4″ to 1/2″ cut from top to bottom and from left to right. You can score your bread using a small sharp kitchen knife, razor blade, or bread lame.
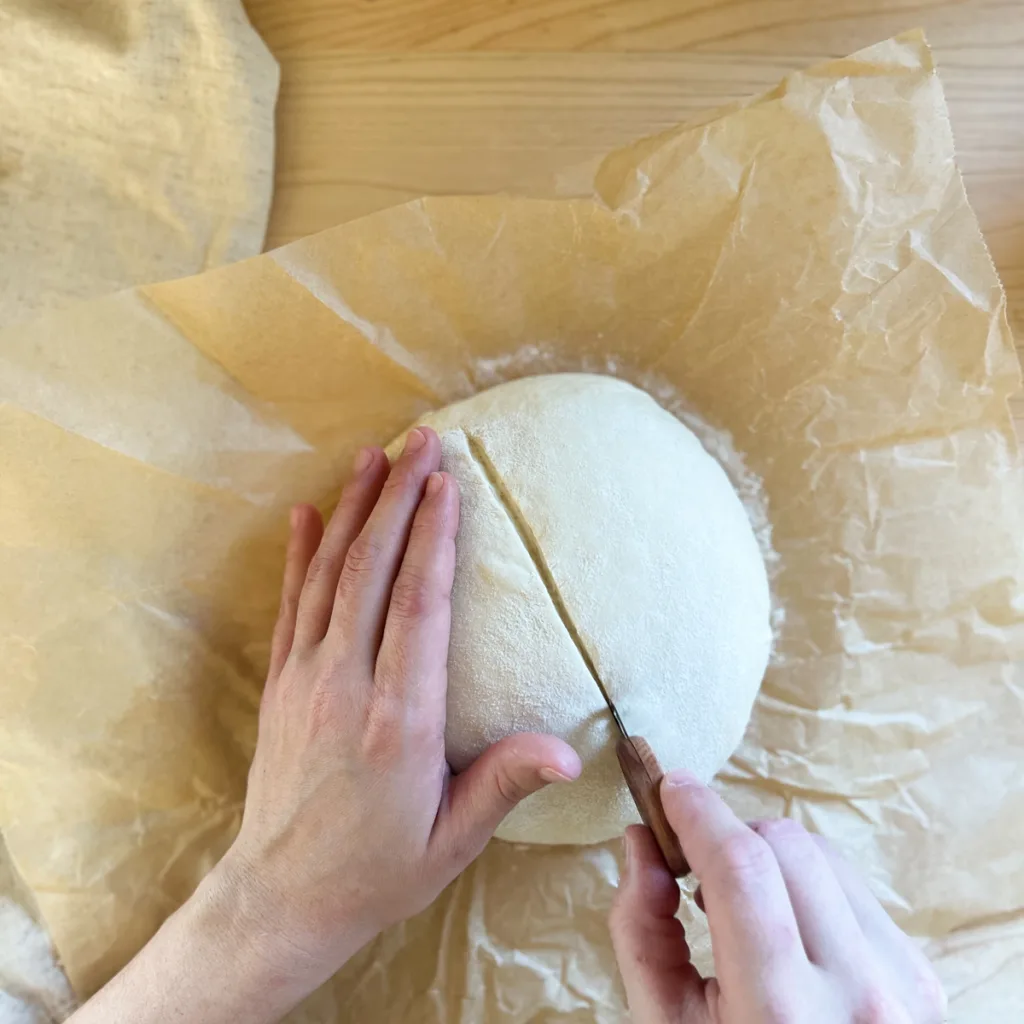
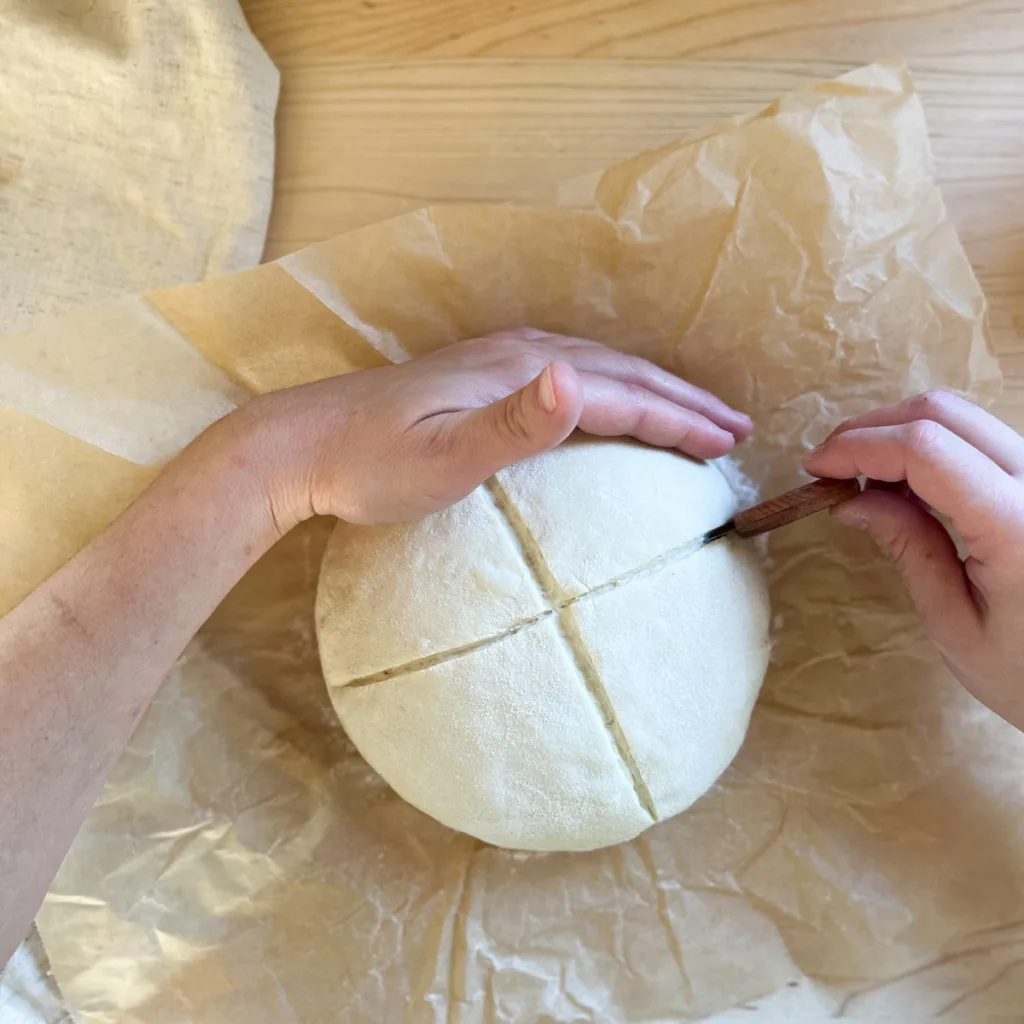
Why Do We Score?
Scoring is done to create a weak spot on the surface of the dough and allow for excess gas to escape. This also manipulates where the dough will expand during bake giving you more aesthetically pleasing loaves.
After scoring lift your loaf into the hot Dutch oven using the parchment paper. Put the lid on and place the Dutch oven back in the oven.


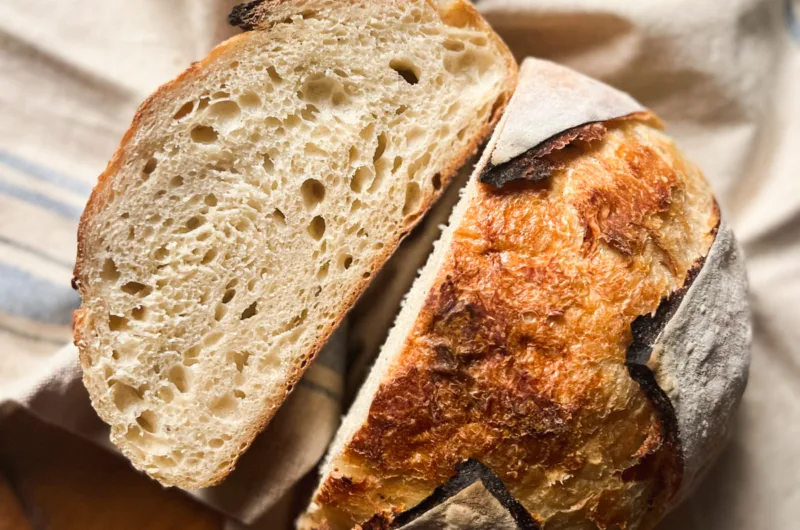
Bake at 480°F for 35 minutes with the lid on. Take the lid off your Dutch oven and continue baking for an additional 10 minutes.
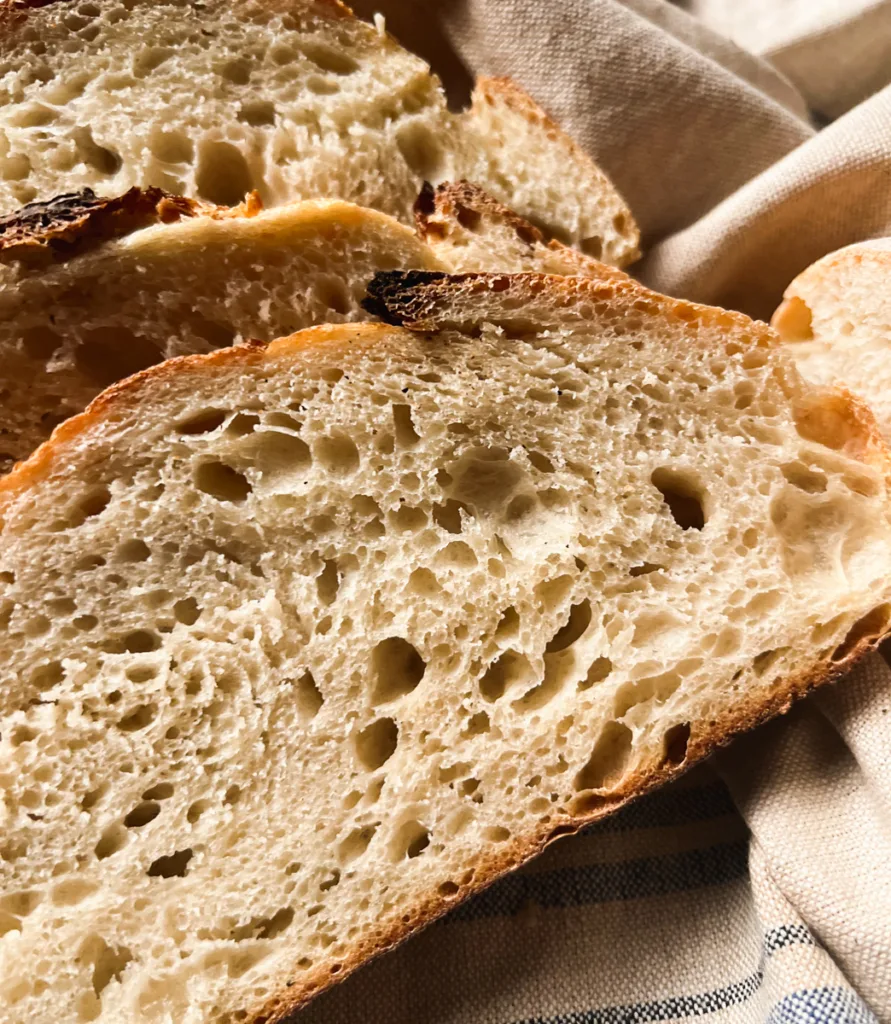
Step 8: The Hard Part
Now that you have your beautiful loaf, comes the hardest and most agonizing part, waiting to cut it. You will want to wait at least two hours before cutting your loaf of sourdough. Once out of the oven the inside of your bread continues to cook. If you cut into it too soon the internal heat will escape and stop the process resulting in a gummy loaf.
Sample Bakers Schedule
8PM (the day before): Feed your sourdough starter.
9AM: Mix the dough.
9:30AM: Perform a stretch and fold set.
10AM: Perform a stretch and fold set.
10:30AM: Perform a stretch and fold set.
4PM: Pre-shape the dough.
5:30PM: Shape the dough.
6PM: Score and bake.
More Easy Sourdough Recipes
Sourdough for Beginners: A Guide & Recipe
1
loaf45
minutes11
hoursAre you wanting to learn how to bake sourdough bread but feeling overwhelmed? This Sourdough for Beginners: A Guide & Recipe will step you through the process in an easy-to-understand way and hopefully give you the confidence to bake your own loaf of sourdough bread.
If you don’t have a starter but would like to make one, take a look at my How to Make a Sourdough Starter guide.
Ingredients
50 g sourdough starter
310 g filtered water
450 g organic bread flour
10 g salt
Directions
- Feed Your Starter
- 8-16 hours before you plan to mix your dough feed your sourdough starter. Cover loosely and place in a warm spot and allow it to peak before using.
- Mix the Dough
- In a large bowl measure out your water and sourdough starter. Whisk together until the starter is completely dissolved into the water.
- Using a stiff spatula add in your bread flour and salt. Once mixing with your spatula becomes difficult finish mixing by hand until everything is fully incorporated.
- Stretch and Fold
- Once your dough is mixed cover your bowl with a damp cloth and allow it to rest for 30 minutes. During this initial rest time, often called autolyse, your flour will fully absorb the water and begin to relax.
- After the 30-minute rest you will need to develop gluten in your dough by performing stretch and folds.
How to Stretch and Fold:
– Lightly wet your hands before handling the dough to prevent sticking.
– Scoop up an edge of the dough and gently pull it upwards.
– Once the dough reaches a point where it resists being pulled go ahead and fold the dough over itself.
– Give the bowl a quarter turn and repeat this stretching and folding motion.
– You will turn the bowl, stretch and fold until the bowl comes full circle. These four stretch and folds are called a set.Loading gallery media… - Repeat this process of resting for 30 minutes and preforming stretch and folds two more times. You will have performed three sets of stretch and folds total.
- Bulk Fermentation
- Cover your bowl with a damp cloth and allow your dough to bulk ferment at room temperature 72°F(21°C) for about 6 hours.
What is Bulk Fermentation?
Bulk fermentation starts as soon as the dough has been mixed and ends right before the dough is shaped. During bulk fermentation the gluten fully forms and the dough rises. This is the most hands-off step in baking a loaf of sourdough bread but often the most difficult to master for sourdough beginners.
How Long will it Take?
There is no set time for how long this will take. Bulk ferment times will depend on the strength of your starter, the type of flour you use, and the temperature of your home. Temperature being the main factor.
At 72°F(21°C) my dough takes about 6 hours to finish bulk ferment. If your home is warmer the dough will ferment much quicker. If your home is colder the dough will ferment much slower.
How do I Know When it’s Done?
The best way to know when bulk fermentation has finished is by the way your dough looks and behaves. You will want to look for these signs:
– The dough has doubled in size.
– Your dough has a slightly domed top with visible bubbles on the surface.
– When you shake your bowl, the dough is light and jiggly.
The first couple of times you bake I suggest checking your dough every hour starting 4 hours after you mixed your dough for these signs. With each bake you will get better at determining when bulk ferment is done. - Shape the Dough
- Once bulk fermentation is done its time to shape your dough. Lightly wet or flour your work surface and turn out your dough. Be gentle when turning out the dough to avoid deflating it.
- The first part of shaping your loaf is called the pre-shape. Pre-shaping is exactly what it sounds like. It’s the process of roughly shaping your dough so that it’s easier to shape.
How to Pre-Shape:
– Lightly wet your hands to prevent the dough from sticking.
– Gently tug the corners of your dough to roughly form a rectangular shape.
– Lift the top edge of your dough and fold it onto the center of itself.
– Lift the bottom edge of your dough and fold it up and over the top fold.
– Now fold in the sides.Loading gallery media… - After pre-shaping you will have a nice somewhat round little ball of dough. Flip this over so it is seam side down and let it rest for 30 minutes. The resting period after pre-shaping is often called a bench rest.
- Now its time to give your dough a final shape. The final shaping is an important step. It will allow your bread to evenly expand upwards and outwards in the oven. It will also create surface tension needed to form that thin and crispy sourdough crust we all know and love.
How to Shape:
To shape the dough cup your hands around it and slowly drag it towards yourself. Turn the dough as needed and continue this technique until you have a tight round boule of dough. If the top of your dough begins to tear during shaping go ahead and stop. This just means you have over shaped. Don’t fret, it will still taste delicious. - Proof the Dough
- After shaping, your dough needs a second rise. This rise is called proofing and is typically done in a banneton or bowl. Dust your dough with flour and place it seam side down in a medium sized parchment lined mixing bowl or round banneton.
- Proofing is finished when the dough is slightly puffed up and no longer dense. This can take 1-2 hours at room temperature. Proofing can also be done in the fridge for 4-12 hours. Fridge proofing takes longer but is a great option for when you’ve run out of time and want to bake the next day. Longer fridge proof times will yield a more sour flavor in your bread.
- Score and Bake
- Now it’s time to bake. Preheat your oven to 480°F with your Dutch oven inside. If you don’t own a Dutch oven, you can use an oven-safe stock pot and lid or check out Crave the Good’s Baking Sourdough Without a Dutch Oven guide.
- Once your oven is preheated you can score your dough. Using the parchment paper lift your dough from the proofing bowl or gently flip it out of your banneton. To score your dough make a 1/4″ to 1/2″ cut from top to bottom and from left to right. You can score your bread using a small sharp kitchen knife, razor blade, or bread lame. Scoring is done to create a weak spot on the surface of the dough and allow for excess gas to escape. This also manipulates where the dough will expand during bake giving you more aesthetically pleasing loaves.
- After scoring lift your loaf into the hot Dutch oven using the parchment paper. Put the lid on and place the Dutch oven back in the oven. Bake at 480°F for 35 minutes with the lid on. Take the lid off your Dutch oven and continue baking for an additional 10 minutes.
- The Hard Part
- Now that you have your beautiful loaf, comes the hardest and most agonizing part, waiting to cut it. You will want to wait at least two hours before cutting your loaf of sourdough. Once out of the oven the inside of your bread continues to cook. If you cut into it too soon the internal heat will escape and stop the process resulting in a gummy loaf.


Notes
Did you make this recipe?
Tag @madeinmotherood on Instagram and hashtag it with #madeinmotherhood
Like this recipe?
Follow @madeinmotherhood on Pinterest

Hello!
When you take the bread out of the oven, do you keep it in the Dutch oven while it cools or take the loaf out?
Thank you!
Hey Jennifer! I typically take the loaf out of the dutch oven and allow it to cool on the counter, but either way should work!
So easy and comes out perfect every time!!
I follow your recipe to a T every time and it comes out amazing! I let my dough rise on the counter for at least 12 hours after my last stretch and fold, and I have had good results. I may need to adjust this during the summer time. Thank you for making this process so easy to follow!