
If you are looking to make sourdough without a dutch oven, this sourdough country skillet bread is just the recipe for you. The dough rises and bakes to perfection in a trusty cast iron skillet. With just four simple ingredients, it’s a straightforward sourdough recipe, perfect for beginners.
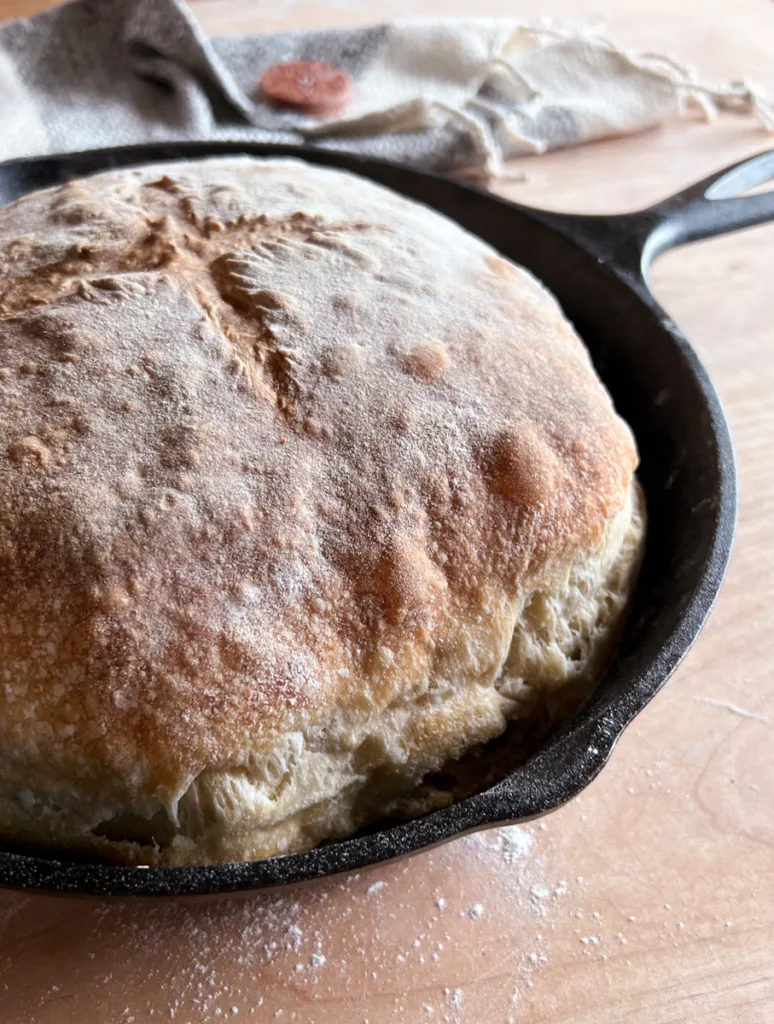
This is the perfect recipe for those just starting sourdough. Sourdough country skillet bread is cooked cooked at a lower temperature than most sourdough bread recipes call for, so you can make sourdough without a dutch oven or added steam. You also don’t have to stress about achieving a perfectly tight shape when shaping the dough, because the loaf is meant to expand in the cast iron skillet. Making this recipe great for those still working on those skills.
This bread is cooked in a 10″ to 12″ cast iron skillet, and yields a large rustic loaf of sourdough that I am obsessed with. To make this recipe you will need a sourdough starter. If you’re not sure what sourdough starter is, check out my How to Make a Sourdough Starter post to learn all about it.
Sourdough Skillet Bread Ingredients
One of the beautiful things about bread – is its simplicity in terms of ingredients. Only a few basic ingredients are needed to make this sourdough country skillet bread recipe.
- Water – When working with sourdough starter I always use filtered water. Tap water contains fluoride which can slow down the fermentation process.
- Sourdough Starter – This recipe uses Sourdough Starter to make the dough rise instead of baker’s yeast. Make sure your starter is fed the night before you plan to bake, so it is active and bubbly when you mix the dough.
- Salt – Salt is added to enhance flavor and strengthen the dough.
- Flour – For this sourdough skillet bread, I used organic bread flour. Bread flour will give this loaf the best rise and the softest crumb. If using all-purpose flour, you may need to increase the amount of flour called for in this recipe.
How to Make Sourdough Skillet Bread
Step 1: Mix the Dough
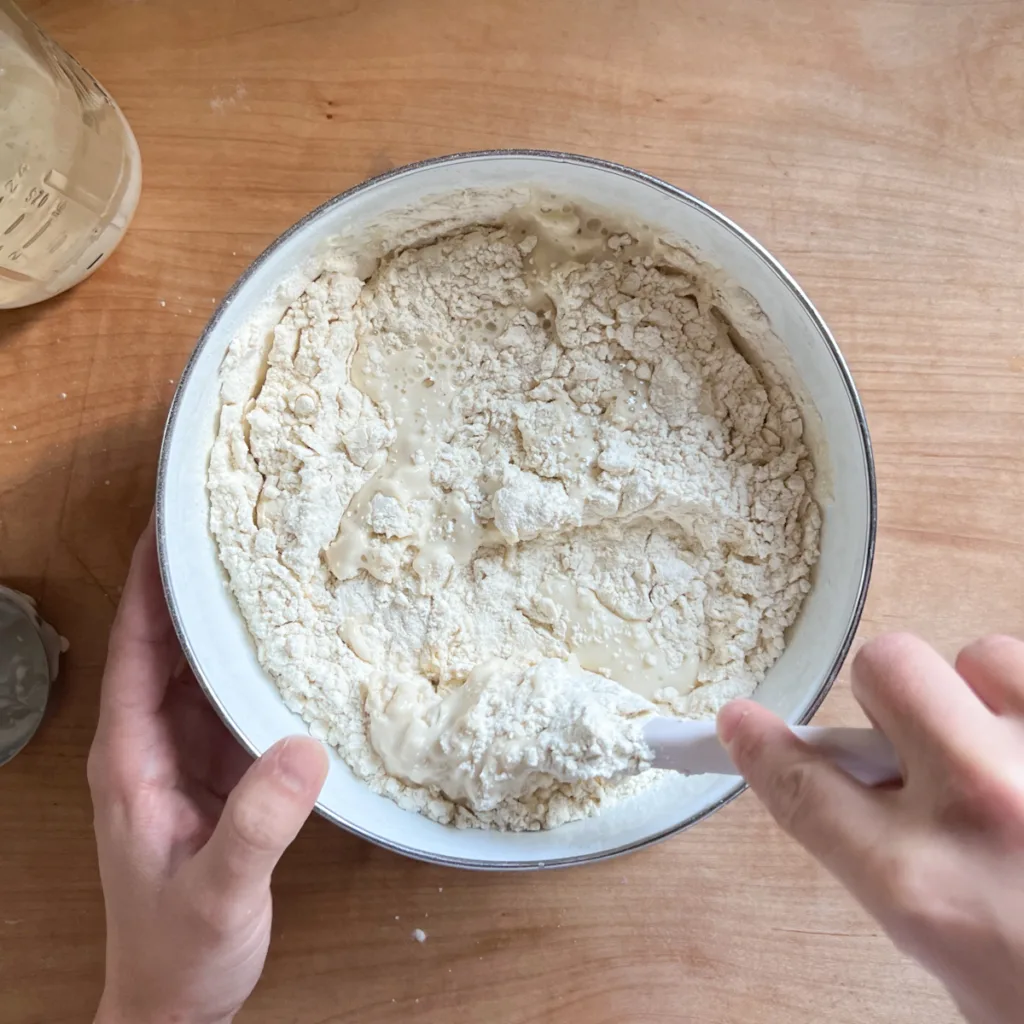
In a large mixing bowl, whisk together the active sourdough starter and water, until the starter is completely dissolved. Then, sift in the flour and salt, and mix by hand or with a stand mixer until no dry bits remain and a dough forms.
Step 2: Strengthen the Dough
After mixing, cover the bowl with a damp cloth and allow the dough to rest for 30 minutes.
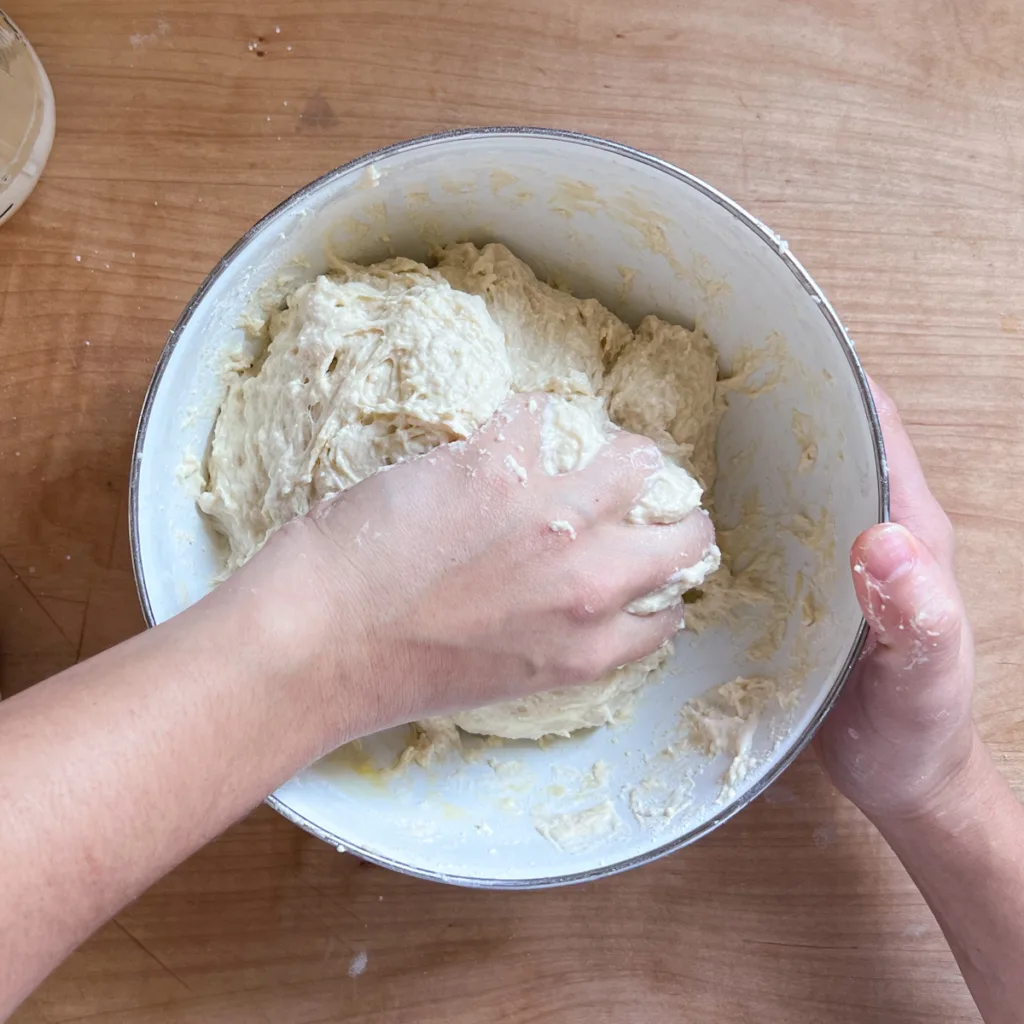
Uncover the dough and knead it on medium speed with a dough hook attachment for approximately 12 minutes. The dough is ready when it becomes smooth and pulls away from the sides of the bowl. If working without a stand mixer, strengthen the dough by hand. To do this perform four sets of stretch and folds, each set separated by a 30 minute rest.
How to Stretch and Fold:
- Lightly wet your hands before handling the dough to prevent sticking.
- Scoop up an edge of the dough and gently pull it upwards.
- Once the dough reaches a point where it resists being pulled go ahead and fold the dough over itself.
- Give the bowl a quarter turn and repeat this stretching and folding motion.
- You will turn the bowl, stretch and fold until the bowl comes full circle. These four stretch and folds are called a set.
- Repeat the process of resting the dough for 30 minutes and performing stretch and folds three more times. You will have performed three total sets.
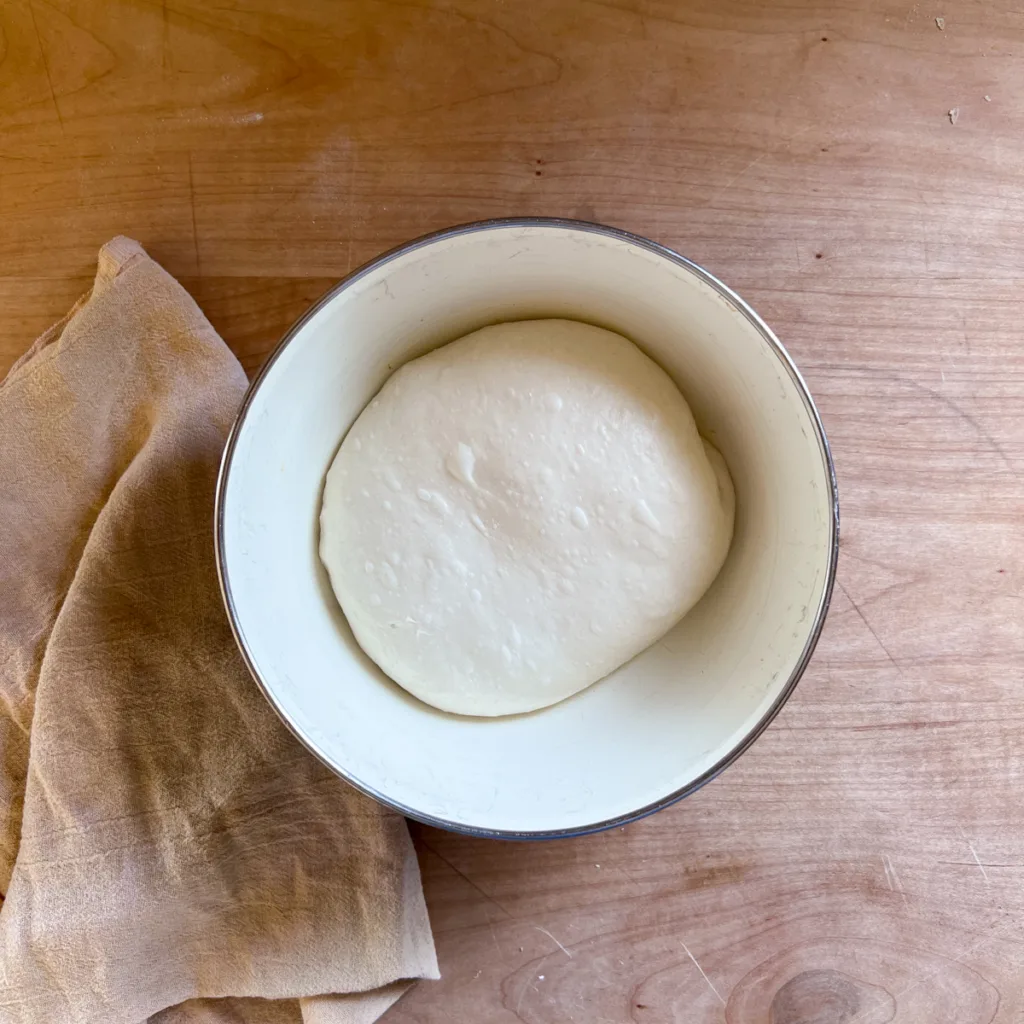
Step 3: Bulk Fermentation
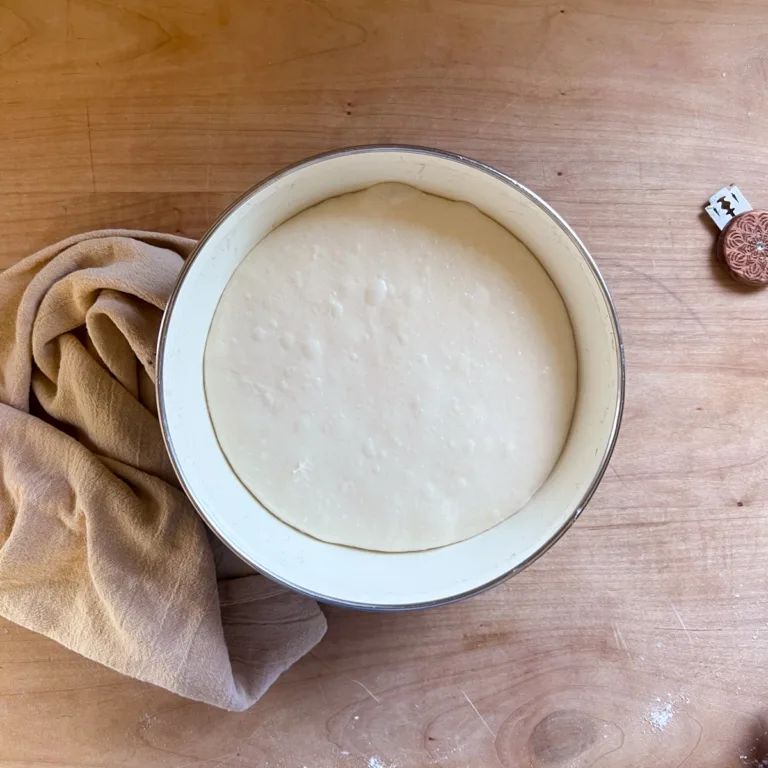
Cover the bowl with a damp cloth or kitchen towel, and bulk ferment the dough at 72°F(21°C) for 5-6 hours. Remember that bulk fermentation begins after the dough has been mixed, so take into account any time taken to strengthen the dough. The dough will need to rise until it is double its original size, has visible bubbles on its surface, and is light and jiggly. It’s important to note that rise times can vary based on the temperature and humidity in your home, so adjust the time accordingly.

Step 4: Shape the Dough
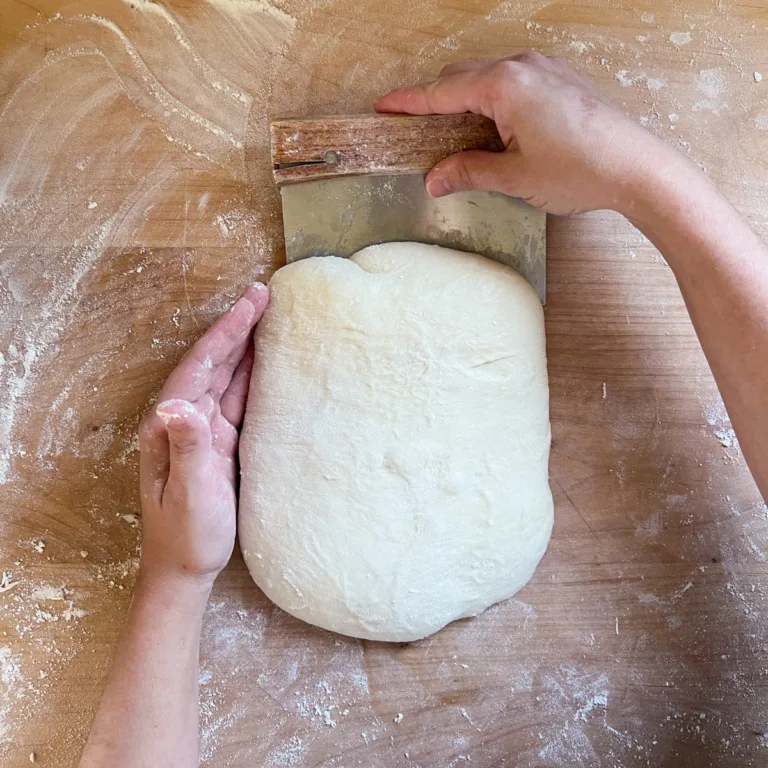
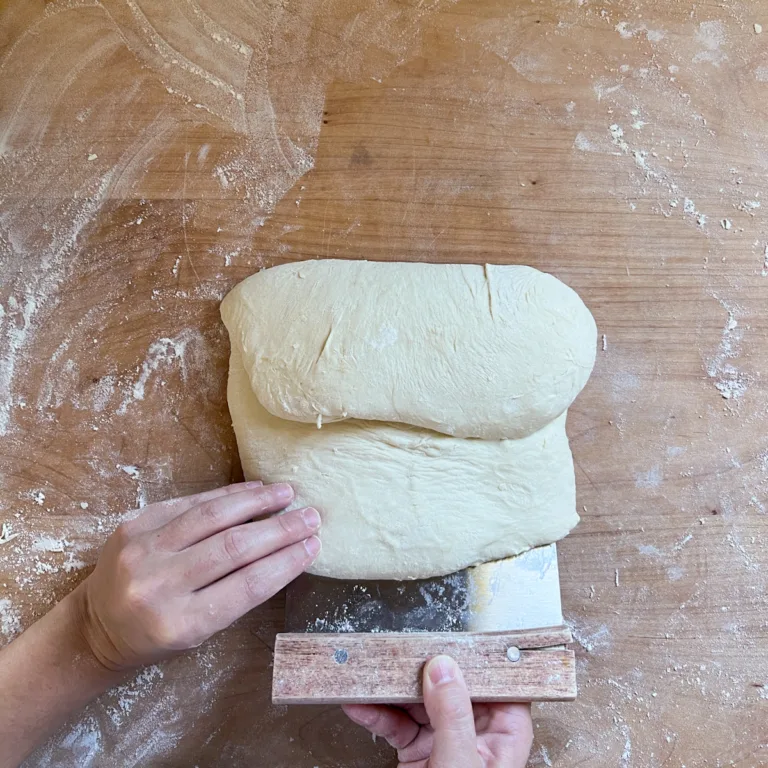
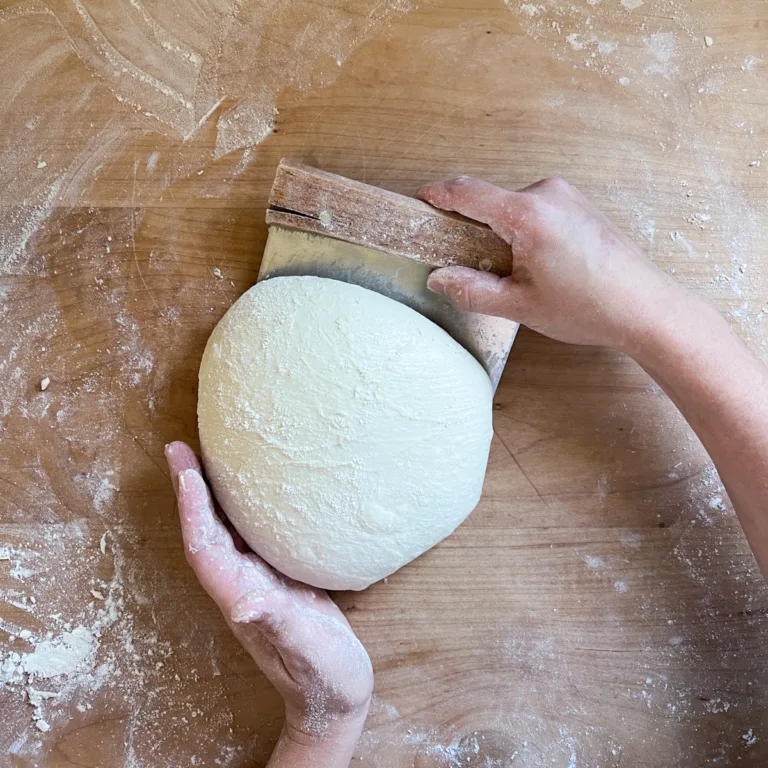
Turn the dough out onto a floured work surface and use a bench scraper shape the dough. Start by folding the top half of the dough up and over on top of itself, then fold the bottom half of the dough up and over on top of itself. Repeat this with the left and right portions of the dough.


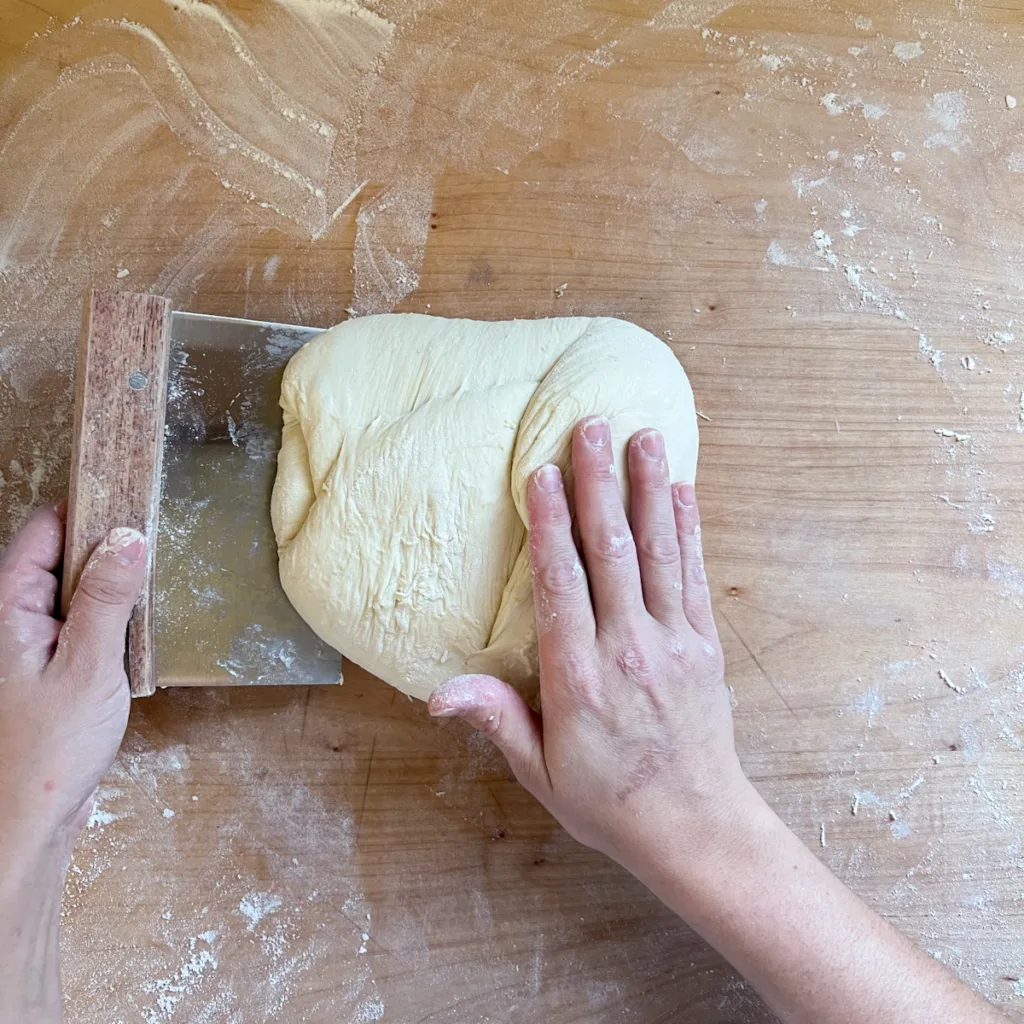
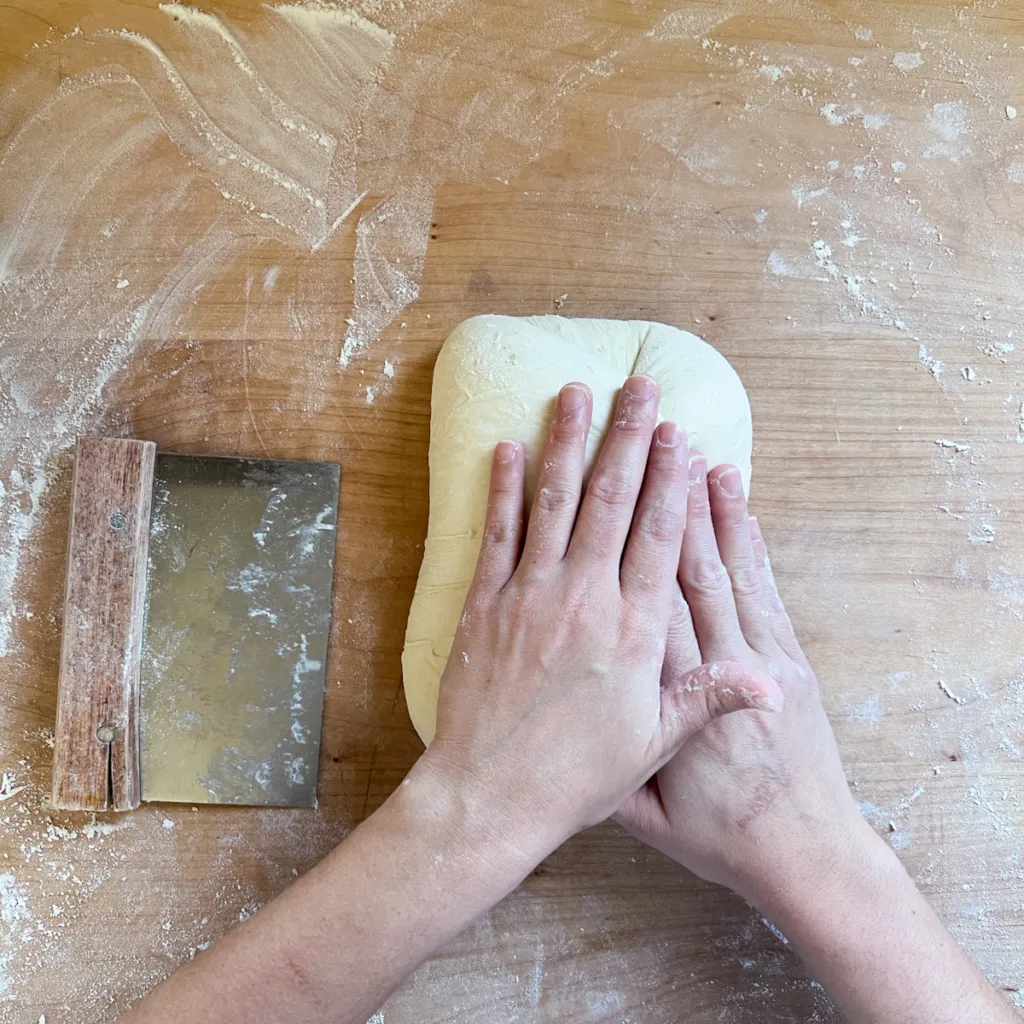
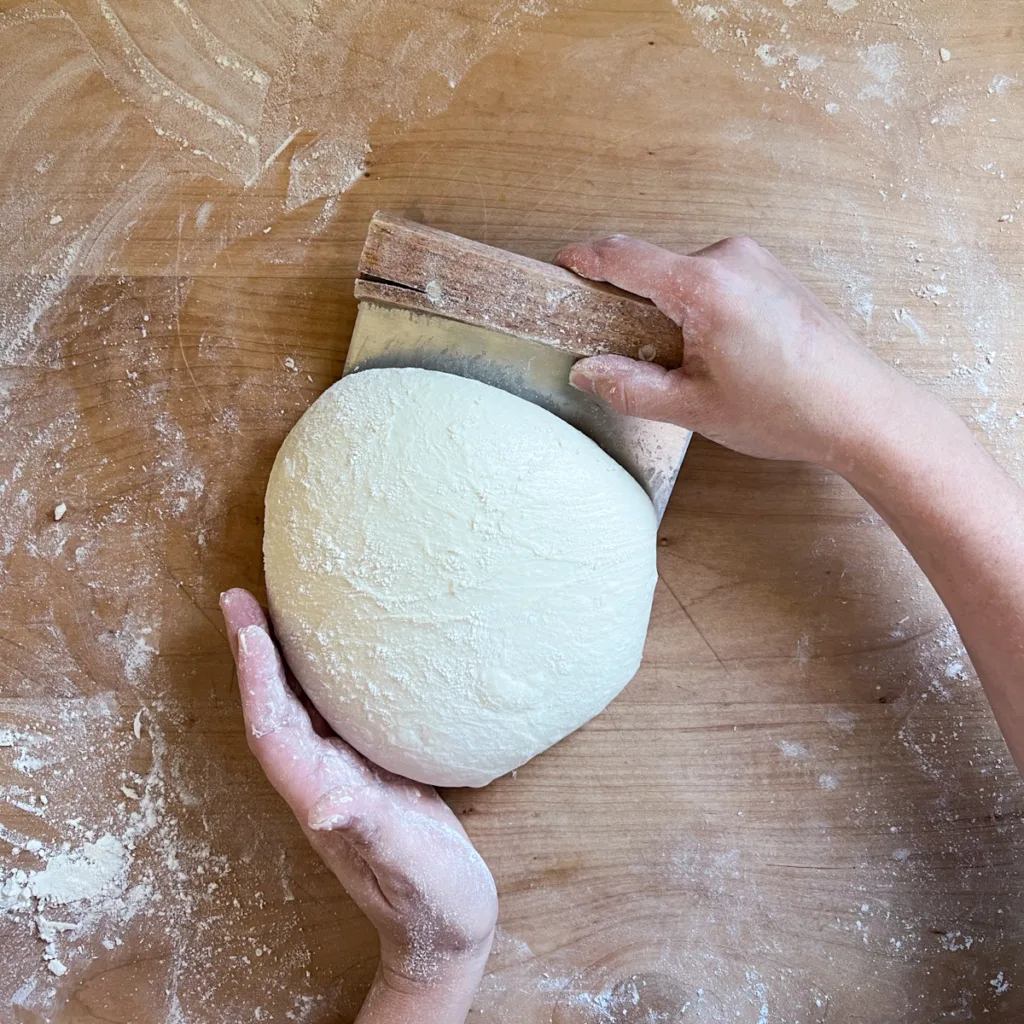
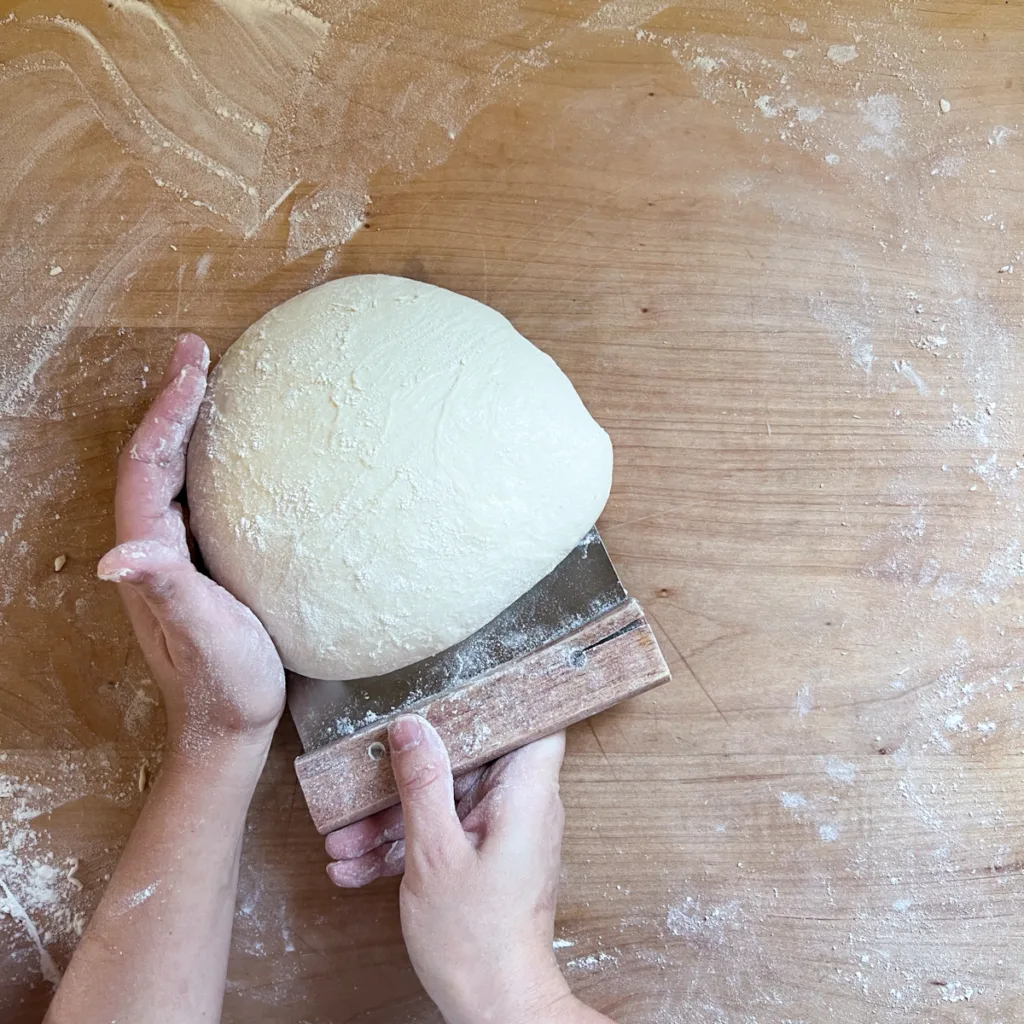
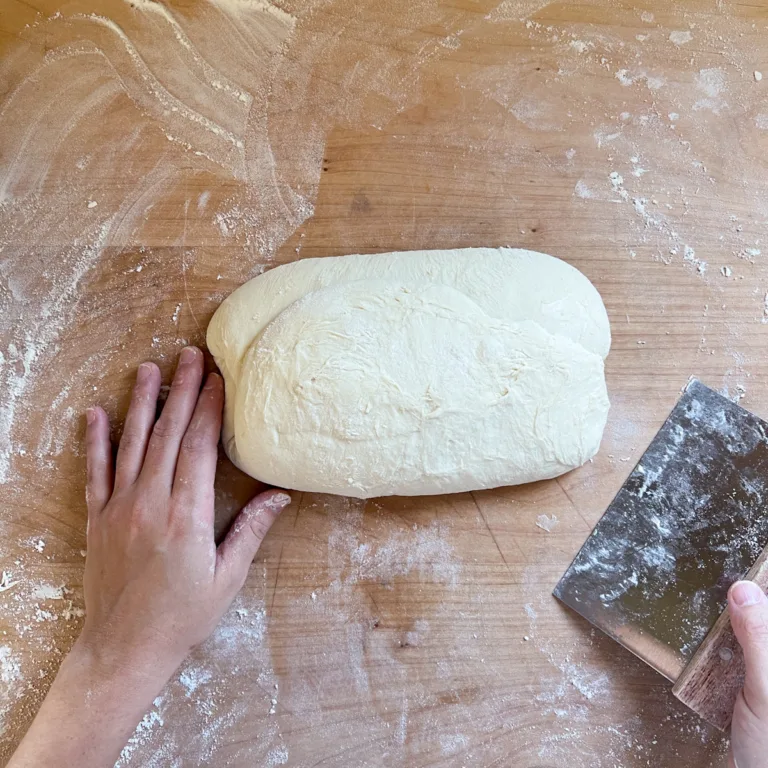
Flip the dough over, and gently push the dough around your work surface to round it off. This can be done with a bench scraper or your hands. The dough should be circular in shape, but there is no need to shape it as tightly as you would when baking in a traditional loaf in a dutch oven. The dough will need a little slack to rise and fill the cast iron skillet.
Step 5: Second Rise
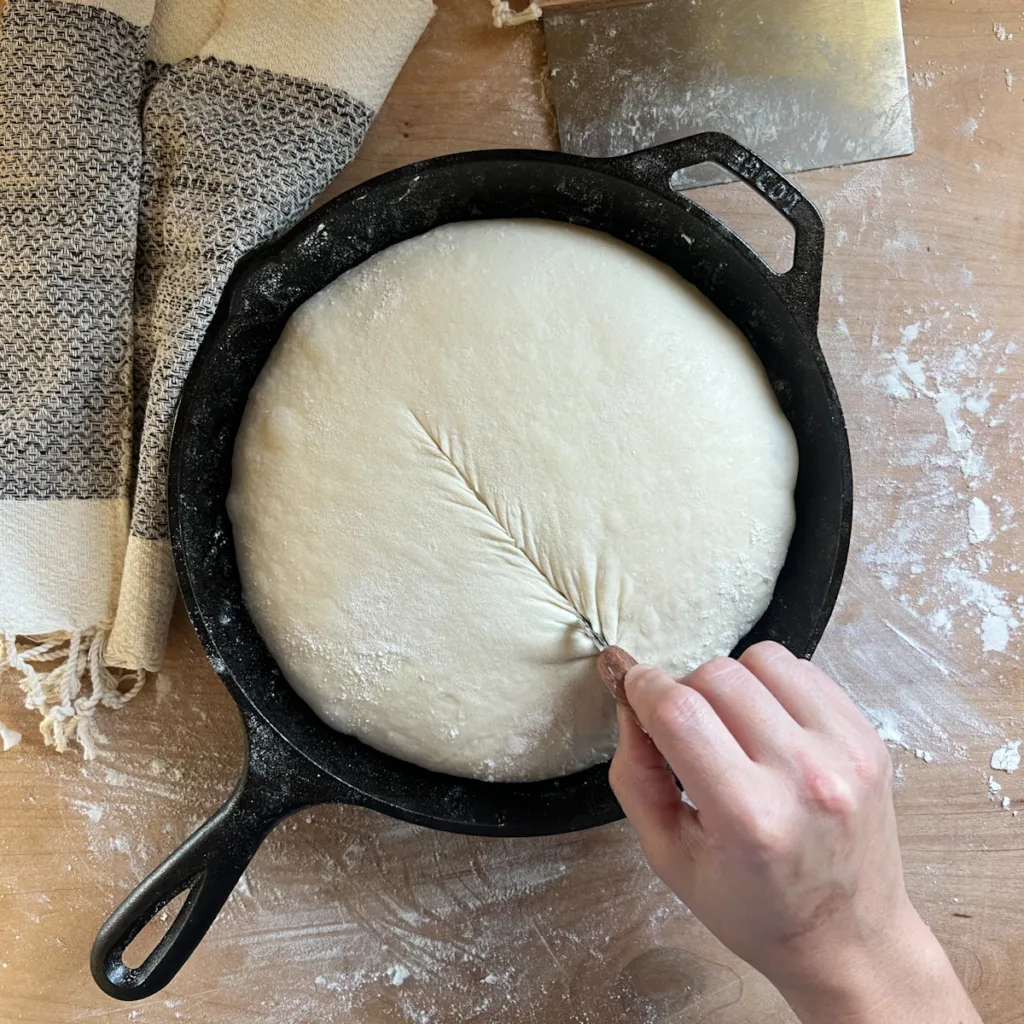
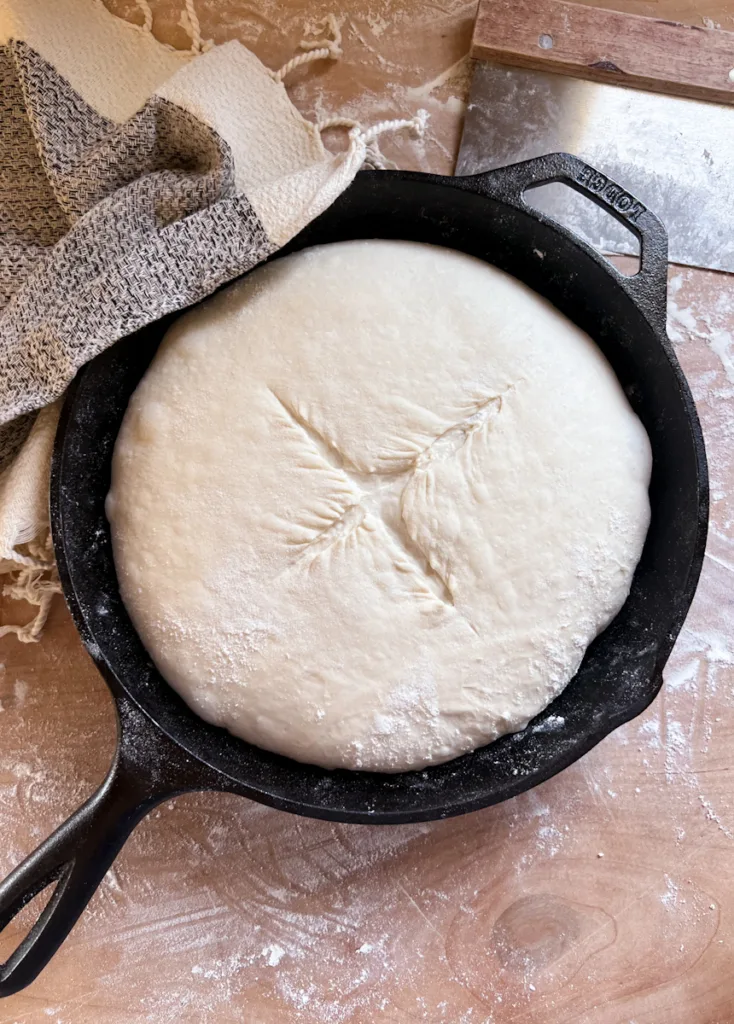
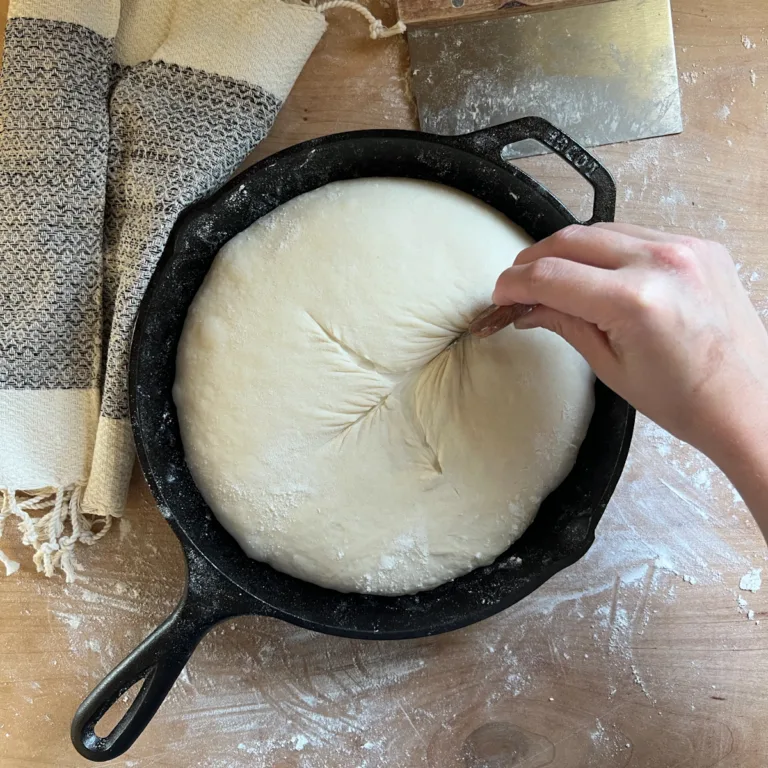
Place your shaped loaf into the center of a lightly floured, 10″ to 12″ cast iron skillet. Cover the skillet with a kitchen towel or cloth, and allow the dough to rise 72°F(21°C) for 1-2 hours, or until the dough has poofed up and expanded to fill the skillet. It’s important to note that rise times can vary based on the temperature and humidity in your home, so adjust the time accordingly.


Step 6: Score and Bake
Towards the end of the second rise, preheat your oven to 400°F (200°C).
Sprinkle some flour on the top of your dough, and use a bread lame or a sharp non-serrated knife to gently score the top of the dough.

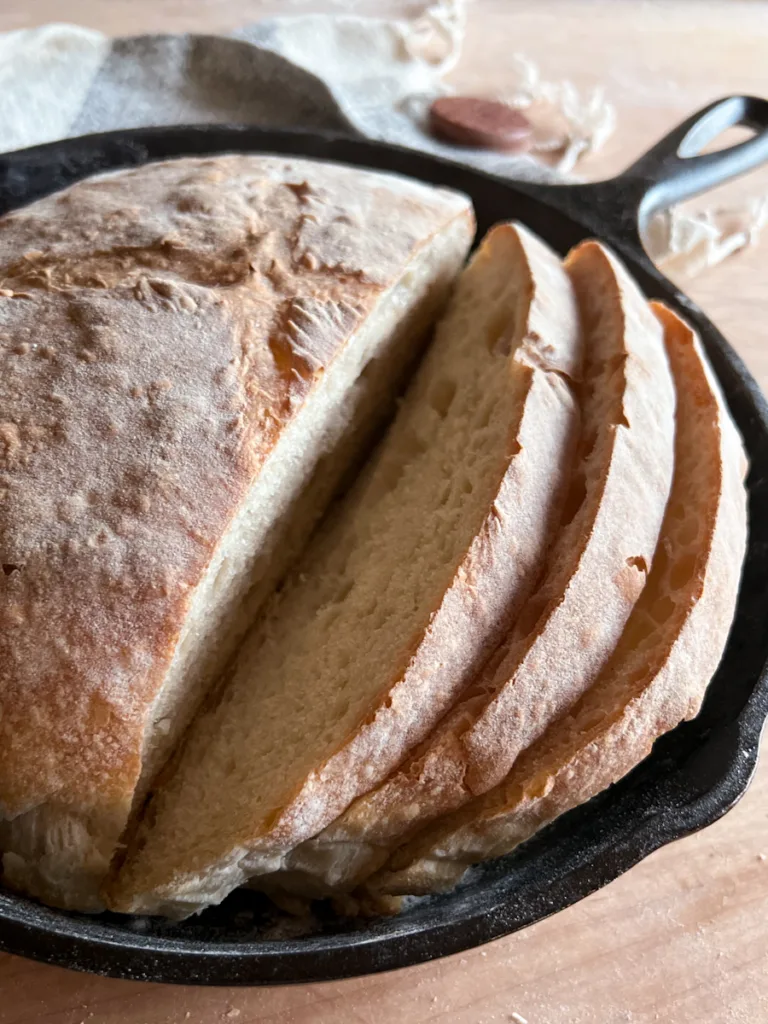
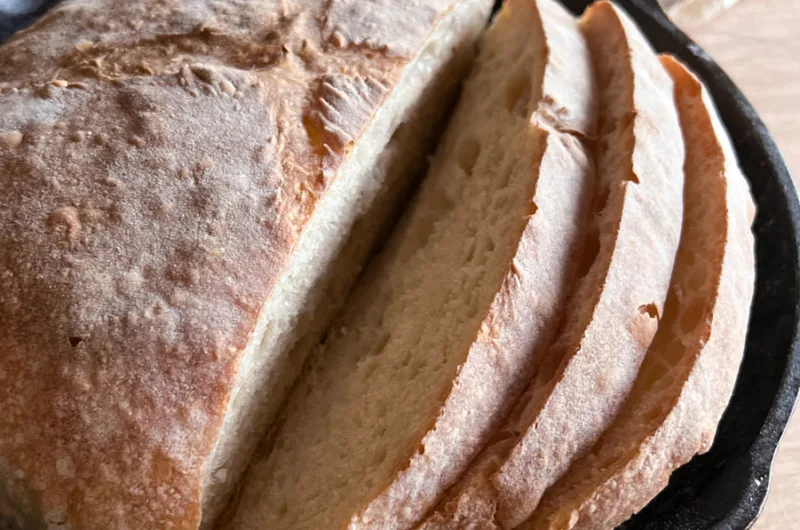
Once your oven is fully preheated, place the skillet with the dough on the lower center rack, and let it bake for about 35-40 minutes, or until you notice the top starting to take on a beautiful golden-brown color.
When the bread is ready, carefully remove the skillet from the oven, and let the sourdough country skillet bread cool for one hour before slicing.
Sourdough Skillet Bread FAQ
Yes, but since all-purpose flour has a lower protein content, you might need to adjust the dough’s hydration or kneading time to achieve the desired consistency. If the dough feels too wet, add a little more flour gradually until it reaches the proper texture.
While a cast iron skillet is ideal for its even heat distribution, you can use a regular skillet as long as it is oven-safe.
Absolutely! You can add various seeds, herbs, or even cheese to the dough during stretch and folds.
It’s generally best to leave the skillet uncovered while baking to allow the crust to develop properly.
Yes, the dough can proof int the skillet overnight to improve flavor and convenience. Cook for an additional 10 if cooking straight from the refrigerator.
Store the leftover bread in a paper bag or airtight container at room temperature for up to 2 to 3 days. For longer storage, freezing is recommended.
Sample Bakers Schedule
9:00 AM: Mix the dough.
9:30 AM: Perform a stretch and fold set.
10:00 AM: Perform a stretch and fold set.
10:30 AM: Perform a stretch and fold set.
11:00 AM: Perform a stretch and fold set.
3:00 PM: Shape the dough.
5:00 PM: Score and bake.
More Sourdough Recipes to Try
- Sourdough for Beginners: a Guide and Recipe
- Sourdough Focaccia Recipe
- Sourdough Sandwich Bread
- Easy Roasted Garlic and Rosemary Sourdough Bread
Sourdough Skillet Bread
10
servings30
minutes40
minutes8
hoursIngredients
1 2/3 cups filtered water (375g)
1/3 cups sourdough starter, active (65g)
2 tsp sea salt (11g)
4 1/2 cups bread flour (540g)
Directions
- Mix the Dough
- In a large mixing bowl, whisk together the active sourdough starter and water, until the starter is completely dissolved. Then, sift in the flour and salt, and mix by hand or with a stand mixer until no dry bits remain and a dough forms.
- Strengthen the Dough
- After mixing, cover the bowl with a damp cloth and allow the dough to rest for 30 minutes.
- Uncover the dough and knead it on medium speed with a dough hook attachment for approximately 12 minutes. The dough is ready when it becomes smooth and pulls away from the sides of the bowl. If working without a stand mixer, strengthen the dough by hand. To do this perform four sets of stretch and folds, each set separated by a 30 minute rest.
- Bulk Fermentation
- Cover the bowl with a damp cloth to bulk ferment the dough at 72°F(21°C) for 5-6 hours. Remember that bulk fermentation begins after the dough has been mixed, so take into account any time taken to strengthen the dough. The dough will need to rise until it is double its original size, has visible bubbles on its surface, and is light and jiggly. It’s important to note that rise times can vary based on the temperature and humidity in your home, so adjust the time accordingly.
- Shape the Dough
- Turn the dough out onto a floured work surface, and use a bench scraper shape the dough. Start by folding the top half of the dough up and over on top of itself, then fold the bottom half of the dough up and over on top of itself. Repeat this with the left and right portions of the dough.Loading gallery media…
- Flip the dough over, and gently push the dough around your work surface to round it off. This can be done with a bench scraper or your hands. The dough should be circular in shape, but there is no need to shape it as tightly as you would when baking in a traditional loaf in a dutch oven. The dough will need a little slack to rise and fill the cast iron skillet.
- Second Rise
- Place your shaped loaf into the center of a lightly floured, 10″ to 12″ cast iron skillet. Cover the skillet with a kitchen towel or cloth, and allow the dough to rise 72°F(21°C) for 1-2 hours, or until the dough has poofed up and expanded to fill the skillet. It’s important to note that rise times can vary based on the temperature and humidity in your home, so adjust the time accordingly.
- Score and Bake
- Towards the end of the second rise, preheat your oven to 400°F (200°C).
- Sprinkle some flour on the top of your dough, and use a bread lame or a sharp non-serrated knife to gently score the top of the dough.
- Once your oven is fully preheated, place the skillet with the dough on the lower center rack, and let it bake for about 35-40 minutes, or until you notice the top starting to take on a beautiful golden-brown color.
- When the bread is ready, carefully remove the skillet from the oven, and let the sourdough country skillet bread cool for one hour before slicing.


Notes
- Don’t have a cast iron skillet? While a cast iron skillet is ideal for its even heat distribution, you can use a regular skillet as long as it is oven-safe.
- Have leftovers? Store the leftover bread in a paper bag or airtight container at room temperature for up to 2 to 3 days. For longer storage, freezing is recommended.
Did you make this recipe?
Tag @madeinmotherood on Instagram and hashtag it with #madeinmotherhood
Like this recipe?
Follow @madeinmotherhood on Pinterest

Is it possible to delay baking with a long CF in the fridge – and if so, at what stage, please? I’m only able to eat fully fermented sourdough for health reasons. Thanks so much, this sounds like a fun bread to make!
Hey Kalyn! Yes! Cold ferment the dough in the skillet or a large round banneton for second rise. You can bake the loaf straight from the fridge, but if baking in a cold skillet I suggest adding 10 minutes to the overall cook time and keeping an eye on the loaf to check for doneness.
I had no idea it was possible to make sourdough this way. Turned out way better than I anticipated for my first loaf. Thank you for all of your instructions and details. Super helpful!
You are so welcome Whitney! I love this easy sourdough method, and I’m glad you do too!
Have you tried this recipe with whole wheat flour?
Thanks for reaching out Dene! I have not tried whole wheat flour when making this specific loaf. I think subbing out some of the bread flour for whole wheat would yield delicious results, just keep in mind whole wheat is less absorbent than bread flour so you might need to adjust the dough’s hydration or kneading time to achieve the desired consistency. When making flour changes to a bread recipe I recommend starting out small and gradually increasing with each bake to find out what works best.
I’ve made this twice and find it so much easier than the DO bread recipes I’ve found. My bread comes out fluffy and delicious each time.
I am so happy to hear this Sancheen! This is one of my favorite ways to make sourdough.
First time making sourdough bread and this was amazing and super easy! I have been using a 60/40 bread flour blend and it is delicious!