
Sourdough cinnamon raisin bread is a soft and delicious sourdough sandwich bread with a beautiful swirl of cinnamon sugar and raisins. It makes a sweet snack and can be turned into a fun French toast for breakfast.

Why I Love This Recipe
This sourdough cinnamon raisin bread is incredibly addictive. It is such a perfectly light and fluffy sandwich bread, filled with tons of cinnamon flavor and plump sweet raisins.
I love eating it by the slice topped with butter and honey. It makes the perfect sweet snack. My kids love when I use this bread to make French toast. Its so delicious and it really takes classic French toast to the next level.
This recipe is incredibly simple, and is perfect for beginner and novice sourdough bakers alike. Enriched doughs, like this one, are very forgiving on rise times, so there is room for error. The entire recipe is a forgiving and easy, and I’ve also included a sample bakers schedule to make it that much easier!
Using Your Sourdough Starter
What is Sourdough Starter? This sourdough cinnamon raisin bread uses sourdough starter to rise instead of traditional bakers yeast. If you’re not sure what sourdough starter is, check out my How to Make a Sourdough Starter post to learn all about it.
For this sourdough cinnamon raisin bread recipe use your sourdough starter when it is at its peak. When is that? Each sourdough starter will behave differently, so learn your starter to know for sure its ready to bake with.
As a general rule of thumb most starters will peak about 8-16 hours after their last feeding. When your starter is at its peak it will have at least doubled in size, be light, airy, and filled with bubbles.
Still not sure? Try a float test. To float your starter drop a spoonful into a glass of water to see if it floats. If it does your starter is mature and ready to bake with!
Tips and Tools
Plan Ahead: Sourdough baked goods have a long rise time. Take a look at my Sample Bakers Schedule before you begin so you have a better idea on when to begin and how to plan ahead.
Tools I Recommend
For this recipe I find the following tools quite handy (Amazon affiliate links):
Measure Your Ingredients Correctly
It can be easy to add too much flour to the dough when measuring in cups, leaving you with a dry and dense loaf. For best results this recipe is written in gram conversions.
Grams measurements ensure consistent results each time you make this recipe. If you don’t have a scale to weigh your ingredients, this is one I recommend.
Why Do I Degas The Dough?
For this recipe you will degas the dough after bulk fermentation and before shaping. Degassing is the act of punching the dough down with your fist and knocking out air that has built up during bulk fermentation.
By degassing the dough you redistribute the yeast and sugars, giving you a better second rise. Degassing also removes large pockets of air resulting in a finer more even crumb and a softer texture. Degassing is a common step for breads with a finer crumb like dinner rolls, sandwich bread, and even some pizza crusts.
Can I Cold Proof?
For best results I recommend performing second rise at room temperature. If you are strapped on time, and need to bake later, you can cold proof your dough in the refrigerator after shaping for up to 24 hours.
Bring the loaf out of the fridge before you plan to bake and allow it to finish second rise. Note that cold proofing will give your finished loaf a more sour flavor.
Why Do I Wait To Cut My Sourdough?
Once out of the oven the inside of your bread continues to cook. If you cut into it too soon the internal heat will escape and stop the process resulting in a gummy loaf.

Sample Bakers Timeline
Sourdough baked goods have a long rise time. To make your life a whole lot easier I have included this sample bakers timeline to give you a better idea on when to start and how to plan ahead.
9 PM (day 1): Mix the dough together and cover to rest.
9:30 PM (day 1): Knead the dough, and cover for bulk ferment.
7 AM (day 2): Assemble the sourdough cinnamon raisin bread.
7:30 AM (day 2): Cover for second rise.
10:30 AM (day 2): Bake the sourdough cinnamon raisin bread.
11 AM (day 2): Cool for two hours at room temperature on a cooking rack.
1 PM (day 2): Slice and serve or store.
More Sourdough Recipes to Try
- Sourdough Crescent Dinner Rolls
- Sourdough Brown Butter Cinnamon Rolls
- Creamy Chicken and Sourdough Dumplings
- Sourdough Country Skillet Bread

Sourdough Cinnamon Raisin Bread
12
servings45
minutes16
hoursSourdough cinnamon raisin bread is a soft and delicious sourdough sandwich bread with a beautiful swirl of cinnamon sugar and raisins. It makes a sweet snack and can be turned into a fun French toast for breakfast.
Ingredients
- The Dough
310 g filtered water
75 g sourdough starter, active and bubbly
75 g granulated sugar
500 g bread flour
8 g salt
4 tbs unsalted butter, room temperature (56g)
- The Filling
1/4 cup granulated sugar
1 tbs ground cinnamon
1/2 cup raisins
Directions
- Mix the Dough
- In a large mixing bowl, combine the water, active sourdough starter, and sugar. Whisk together until the sourdough starter has completely dissolved.
- Next add in the bread flour and salt. Mix until a shaggy dough forms.
- Add the room temperature butter in small pieces, and mix by hand or in a stand mixer, until it is fully incorporated.
- Strengthen the Dough
- Once your dough is formed, cover the bowl with a damp cloth and allow the dough to rest for 30 minutes. During this time the flour will fully absorb the water, and the dough will relax.
- Using a stand mixer, knead the dough on medium-low with a dough hook attachment for about 10 minutes, or until the dough is smooth and elastic and fully pulls away from the sides. Alternatively, knead the dough by hand for the same amount of time.
- Bulk Fermentation
- Cover the bowl and dough with a damp cloth and allow it to rise for 8-10 hours at 70°F/21°C. Rise time will vary based on the temperature of your home. Add time to bulk fermentation if your home is cooler and subtract time if your home is warmer. Your dough will have doubled in size when bulk fermentation is done.
- Shape the Loaf
- When you are ready to shape your loaf, degas the dough by punching it down and removing as much air as possible, before turning it out onto a lightly floured surface.
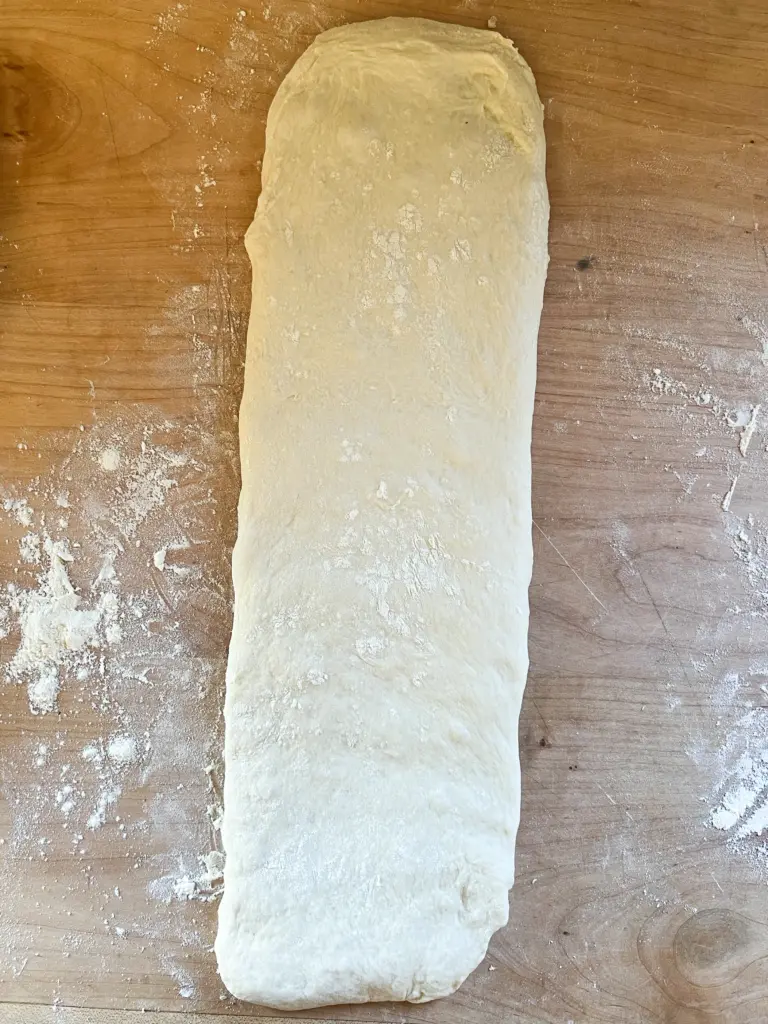
- After turning out the dough, use floured hands to gently pull it into a 5″x18″ rectangle. You don’t need to be exact with the size, a rough estimate will do. Use a pastry brush to brush the top of the dough with water.
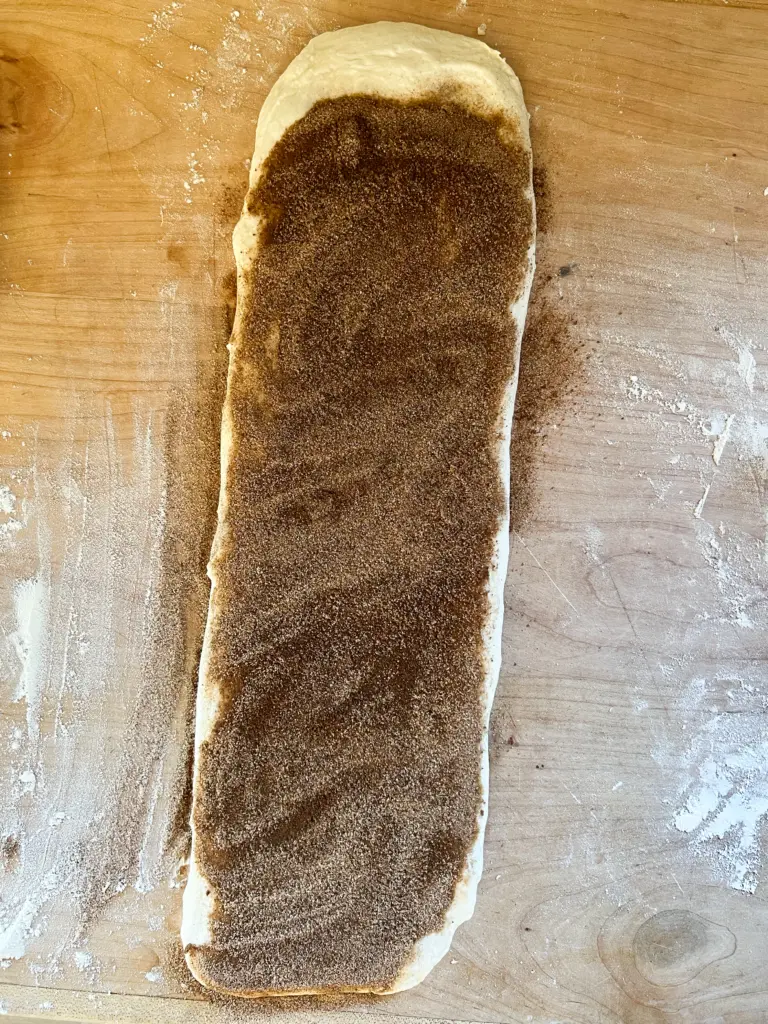
- In a small bowl combine the granulated sugar and cinnamon to create the filling. Spread the filling evenly on the dough, making sure to leave a one inch margin lengthwise. This margin will help seal the loaf.
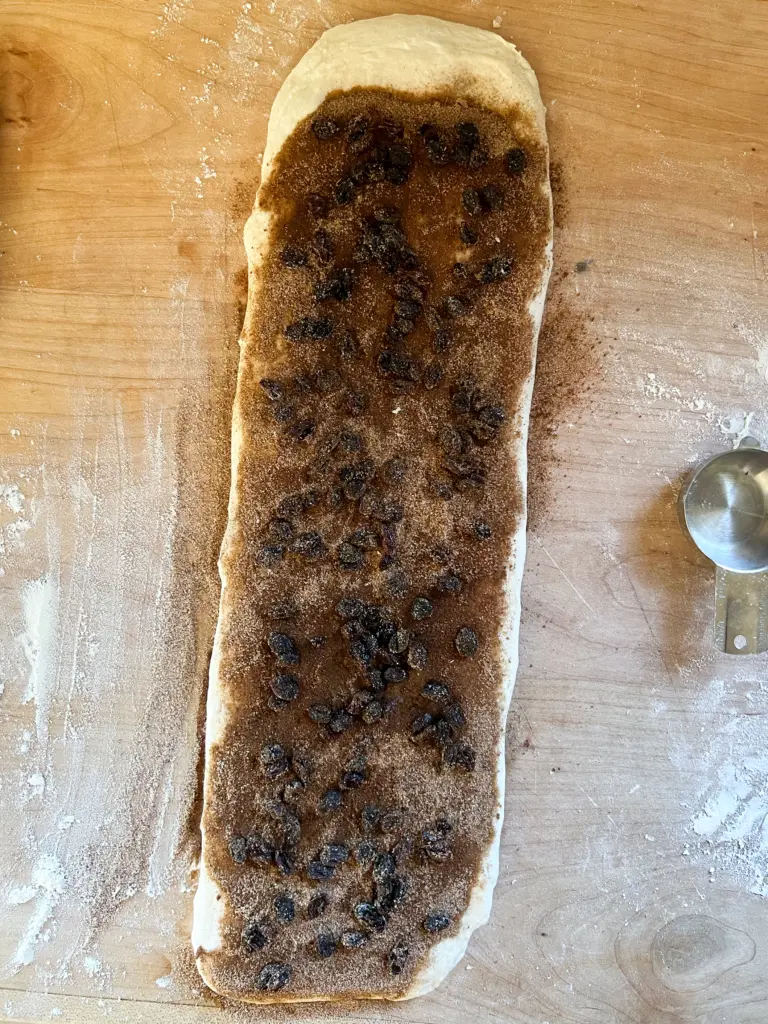
- Next, sprinkle the raisins evenly on top of the cinnamon mixture. Still leaving the margin for sealing.
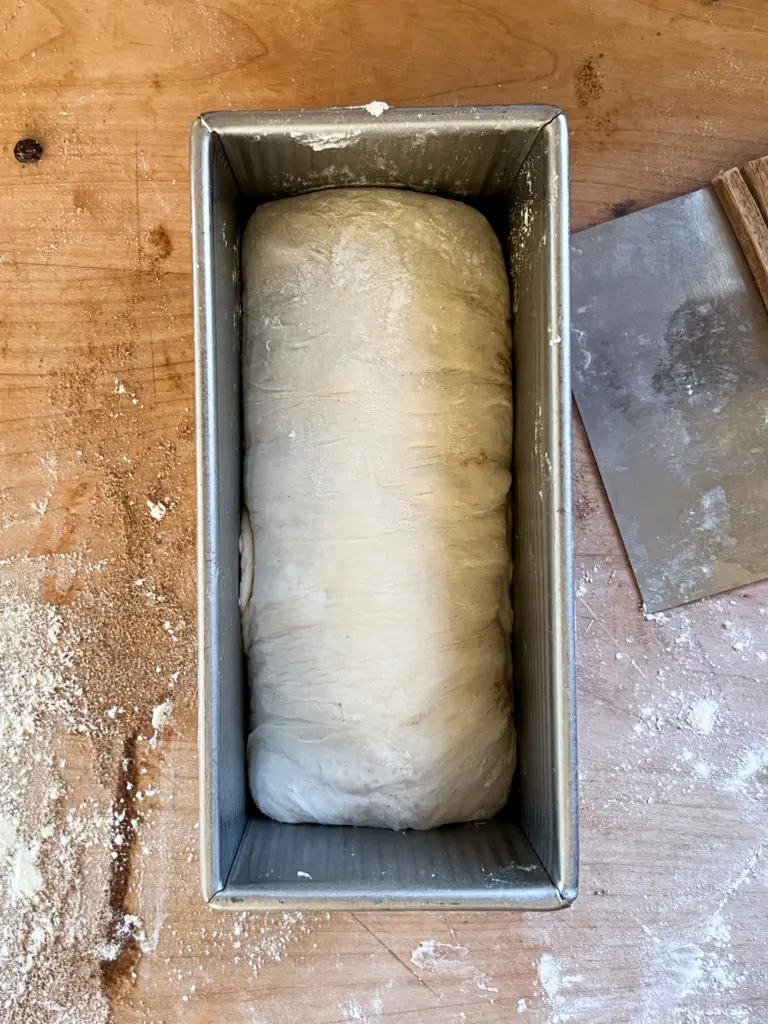
- Starting at a long end, tightly roll up the dough into a log shape and gently tuck the ends in. Lightly butter your loaf pan and transfer the log of dough.
- Second Rise
- Cover the top of your bread pan with a damp cloth to prevent the top of your dough from drying out. Leave the dough to rise for 2-3 hours at 70°F/21°C or until the dough has risen 50% of its original size. Rise time will vary based on the temperature of your home.
- Bake
- Pre-heat your oven to 375°F/190°C and bake your loaf on the second to bottom rack for 45 minutes. Allow the loaf to cool for 30 minutes before transferring it to a cooling rack to finish cooling for at least two hours.


Notes
- Make it Vegan: To make this sourdough cinnamon raisin bread vegan, simply replace the butter with your favorite plant-based butter or oil.
- Tools I Recommend (Amazon affiliate links): Stand Mixer | 9″ x 4″ Sandwich Bread Pan
Did you make this recipe?
Tag @madeinmotherood on Instagram and hashtag it with #madeinmotherhood
Like this recipe?
Follow @madeinmotherhood on Pinterest

Huge Success! I ended up doing the second rise in the refrigerator for 24 hours so that I didn’t have to stay up super late. It turned out great!
Thank you for sharing KMD!
Just made this for the first time today! Delicious!! very easy to follow recipe and it turned out great! I absolutely could not wait 2.5 hours to try it though, I only last an hour!
Thank you for sharing Mlucero. I’m happy to hear you liked the recipe!